Repair of high gloss polished polyester lacquer finishes
Repair of high gloss polished polyester lacquer finishes

(Translation of German article Die Reparatur hochglanzpolierter Lack - Polyesterlack by Martin Renz)

From the end of the 1950s through the 1970s, high-end radio cabinets often had high gloss polished finishes. To create such a finish, the surface of the wood was coated with up to 1 mm thick polyester varnish, followed by sanding and polishing. No other process is capable of bringing out such a strong brilliance and luminosity on the surface as this finishing process can. The durability is exceptionally good; alcohol, water, and many other solvents do not attack the surface, and the finish is extremely hard. As a result, many radios today still have a passable to good finish quality. However, not all have held up well; with abuse and rough handling, even these finishes can be destroyed. In particular, heat and impacts, as well as scratches and careless handling, damage these finishes.
As an example, I'll show below how to successfully repair damage to the cabinet of a Saba "Freiburg 100" from 1960 (link to the model page), resulting in a cabinet that appears practically brand new.
Preparation
First, the chassis and speakers are removed, along with the plastic side grilles.

The cabinet showed some surface damage from impacts (a typical radio from the Garage of an apartment dweller, who had stacked up dozens of items).

The surface shows some pretty deep scratches.


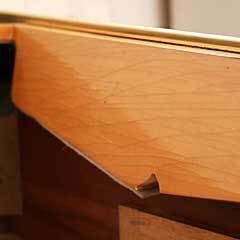
The lacquer on the light Maple sections was crazed due to age. The brass trim was tarnished in some places; here the protective coating had been rubbed off.
Unfortunately, the Maple pieces could not be removed from the cabinet without destroying it. The trim pieces also could not be removed.
Stripping the finish
First the crazed lacquer was stripped from the light Maple areas with Grüneck stripper [a German brand of paste-like, solvent-based paint remover]. The stripper also attacks the polyester finish on the rest of the cabinet; therefore one must proceed cautiously here. Hand and eye protection are important! After a penetration time of 30 minutes, the lacquer can be fully removed with a dull putty knife. Afterwards the surface is washed with paint thinner, which also removes the remaining protective coating from the brass trim. The polyester finish is resistant to the thinner. Using very fine (00) steel wool, the brass trim is brought back to a bright shine. For severely tarnished brass, a mixture of scouring powder [ATA and VIM are cited - probably German products similar to Comet], salt, and vinegar is helpful. After the Maple wood was dry, it was carefully sanded in the direction of the grain with 150 and 220 grit sandpaper on a cork sanding block. When doing this, one has to be careful not to scratch the brass trim, which is not easily avoided. Use of masking tape can be helpful.
Surface preparation
Now the outside surfaces are dealt with. First, in the chipped areas, the finish is completely removed from the surface of the wood with a fine carving knife. It is important that no finish remain in areas where the lacquer film is no longer bonded to the wood. Unfortunately, this also removes the dark brown stain, revealing the light mahogany veneer. This light area has to be restained. Most types of stain are suitable for this; for small areas even a felt pen can be used. However, these sometimes don't have very good resistance to fading.

Two difficults may arise: 1. The correct color won't be revealed until later. Note that the color, after coating with polyester, will appear a lot lighter! Very much lighter! Therefore one should under all circumstances choose a somewhat darker color. A factor to consider is that the eye tolerates dark spots on wood as typical of wood, while light spots appear as mistakes. Therefore, when in doubt, choose black instead of a lighter brown color, and sometimes it is necessary to reapply the stain several times. 2. The edges of the thick lacquer coating will be stained along with the wood, and this will later be visible, since one can see in three dimensions within the thick lacquer film. I don't really have a good solution for that; perhaps the use of water-based stain may help, since it does not wet the lacquer. To whatever extent possible, keep the edge of the lacker coating free of stain. Admittedly, water-based stain doesn't cover as well, and a too-light color is likely to be more visible than the thin stained edges of the lacquer film.
Lacquer repair
After sufficient drying, we turn to the repair of the lacquer finish. These days polyester lacquer has pretty much vanished from the marketplace; however it still sees some specialized usage in pianos, instrument panels, and the like. It is therefore difficult to obtain. Help can be found, however, in hobby shops, where polyester casting resin is still available. As long as it is not necessary to coat big surfaces, this works very well. The casting resin is mixed in small quantities with hardner according to the manufacturer's instructions.
Some things to pay attention to when doing this:
1. The temperature of the room and the radio should be at least 20 to 24 degrees Celsius.
2. The maximum amount of hardner recommended by the manufacturer should be used.
Background information: Because of the small amount of resin, the self-warming of the resin during curing has little effect. When casting objects, this self warming causes the resin to cure within a few hours. Since too much heat damages the resin, the resin is formulated so that it cures slowly, and the self-warming is not excessive. In our case, however, this ends up preventing rapid curing of the resin. At room temperature, hardening can take days. In an oven, or in the summer sun, it can harden within a few hours.
Adding more hardner to solve this problem is not recommended, since this causes the chemical reaction to proceed in a manner that no longer sufficiently hardens the resin. In addition, this may cause the resin to yellow.
The well-mixed casting resin is now applied to the damaged areas. At edges, use of masking tape keeps the resin from running over the edge (the white strip in the middle of the picture below).
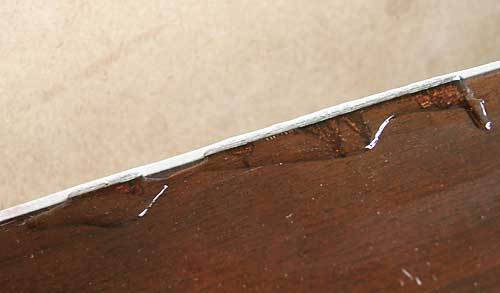
Bubbles disappear by themselves with the passage of time. The top and side surfaces have to be dealt with separately, since the resin only flows as desired on level surfaces. If all voids are not filled, the process needs to be repeated.
Sanding the lacquer
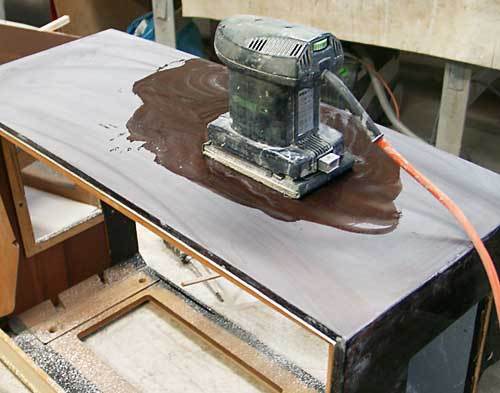
In the repaired places, the resin now protrudes 1-2 mm above the lacquer surface. This has to be sanded off. For this purpose, one uses special "wet sanding paper" which is available in paint or automotive stores. We need one sheet each of 180, 240, 320, 400, 600, 800, 1000, and 1200 grit. The sanding is best done with a small reciprocating sander or a polishing machine of the type used for sanding and polishing automotive paint. It is important to use water when sanding. This keeps the lacquer cool and flushes the debris away. The surface is therefore sprinkled with water, and beginning with 180 grit paper, the protrusions are sanded off, until they are completely level with the rest of the lacquer surface.
Depending on the condition of the surface, the whole surface may be sanded, until all scratches are completely sanded out. If the scratches are not too deep, it may be sufficient to first sand the main surface with 240 grit paper. One should try to sand as little as possible. In particular, the lacquer as applied by the factory may already be very thin at the edges and corners. Here one must use utmost caution to avoid sanding through the finish. As soon as the surface has no scratches other than the scratches from the sandpaper being used at the moment, the surface should be rinsed and dried for inspection. After a critical inspection, any remaining scratches can be further sanded. As soon as it is certain that no more improvement is possible, the next grade of sandpaper in the sequence is used. Here again, the sanding continues only long enough to eliminate the scratches from the previous grade of sandpaper. It's best to inspect carefully; otherwise one has to start over again from the beginning!

Never sand without water! The process continues in this manner up to the use of the 1000 grit sandpaper.
Lacquering of the front areas
At this point, I interrupted the work and once again sanded the Maple surfaces and cleaned the brass trim pieces. The front areas were then coated with clear lacquer (with a spray gun; a spray can also works in emergencies) and carefully sanded smooth with 280 grit sandpaper. No "orange peel" effect should remain visible; the surface must be perfectly smooth. This is repeated two times; the final spraying follows with gloss lacquer. This doesn't really produce a "high gloss" finish; however this isn't really noticed on the narrow front surfaces, and was also the method used originally. The outside surfaces may get coated with a little mist when doing this, especially if one tries to coat the edges, since the finish on the edges may have been sanded through here and there. Once the lacquer is no longer tacky, the lacquer mist can be carefully removed from the outside surfaces with paint thinner. Near the front edges one has to be careful to avoid damaging the fresh lacquer.
Once the lacquer on the front was good and hard, the final sanding of the outside surfaces was done with 1200 grit sandpaper.
Finish
The surface finish at this point is still flat and dull. Now the surface is polished with polishing compound using a felt disk on a rotating polisher of the type used for automotive polishing. To finish off, a lambskin polishing disk is used. The polishing compound can be remoistened with water if necessary. There is also special buffing equipment; airplane and yacht builder are familiar with these.
High rotation speed is not to be used when polishing; heating of the lacquer must be avoided in all cases!

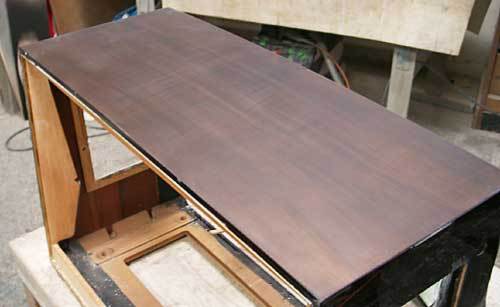
The result is self evident: All chipped areas are now smooth. The previously dented areas are still recognizable to some extent: The stain was still too light and the damage was pretty severe! All the small scratches and many of the small chips are completely gone. The cabinet looks like it has been well cared for and shines with its former beauty. The approximately 7-8 hours needed for all this were well worth it.
To thank the Author because you find the post helpful or well done.

Dear radio friends,
Thank you very much to Martin Renz preparing and to you Thomas translating this very useful and illustrative article.
Regards
Ake
To thank the Author because you find the post helpful or well done.


This is a very welcome post. I have three wooden radios with the polyester varnish including a Grundig needing cabinet restoration. One of the radios has cracked finish all over the top.
I will attempt this method soon.
Thanks for you post,
Paul.
To thank the Author because you find the post helpful or well done.