Wooden radio cabinet restoration
Wooden radio cabinet restoration
Introduction
Collecting, restoration and renovation of old radios may be a very enthralling hobby. Nowadays such vintage models are mainly used as elements of interior decoration, hence their external appeal is of key significance. A restored radio is a beautiful component of a retro style room.
There are a lot of articles on the Internet about repairing and restoration of vintage radios, but most of them concern repairing electronics. In this article, I focus on the restoration of the wooden radio cabinet.
You can do it yourself. It does not require advanced equipment or a wide knowlege and it is not a very expensive venture. You only need some basic tools and a visit to a paint shop or a carpenter’s. The restoration, however, is work consuming, requires patience, accuracy and precision. If you can tinker a bit, with the following quidelines you will be able to return the old beauty of your vintage radio.
Bellow I describe the worst-case scenario i.e. such work which is necessary to restore a very badly damaged cabinet. When it is in better conditionthan the described bellow, you should make sure whether you really need to do such radical restoring. You must be aware that by doing so you are bound to partly remove the history of your rdio and it will lose part of its originality.
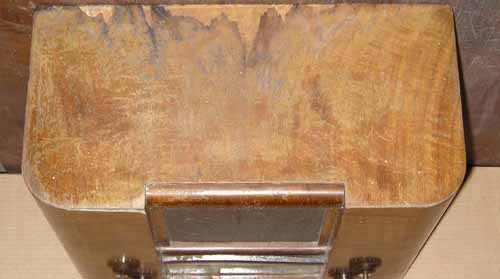
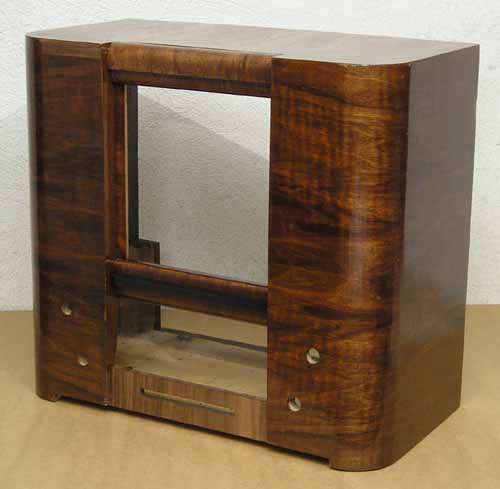
As an example, I choose the model Graetzor Aeropilot (made in 1935) shown in the picture bellow.
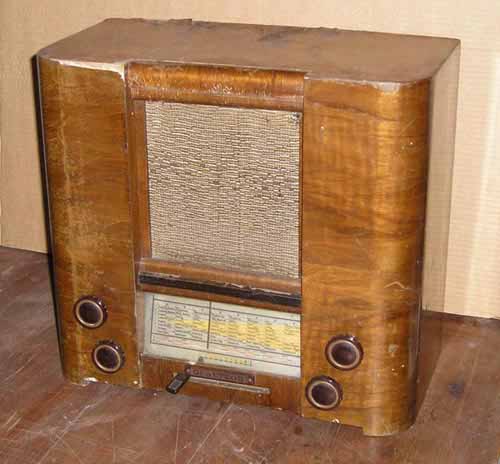
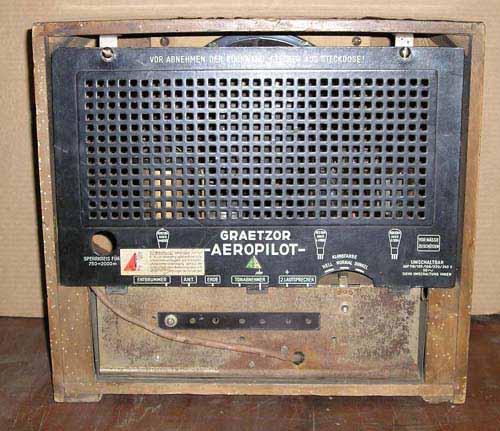
The first impression is not bad; a bit damaged venneer and some woodworms holes. On a closer look you notice that the loss of veneer can not be repaired and must be changed. The badly worm-damaged walls must be reinforced, etc.
The whole work can be divided into several stages, described in detail in the chapters below.
The shown methods of restoration I based on my own experiences. I am sure that they do not exhaust all areas and problems which you can meet during repairing. For example, I do not describe wood polishing since I have never practised it.
Necessary equipment
You can not do without some basic equipment. You need the follow tools:
- carpenter’s presses – 4-6 pcs of different sizes, small ones for damping flat elements, big ones for clamping the whole cabinet
- a small syringe with a thick needle – to inject glue into apertures e.g. under the venner where it comes off
- a small scraper – for removing the old lacquer or polish
- a hard brush – for cleaning the cabinet
- a wooden block covered by felt on one side
- a small spatula
- a sharp knife e.g. used for wallpaper cutting
- brushes – different sizes
- small lathes of different sizes and thickness for equal press even pressing while jointing splits
- a solderer – for dismantling and montaging the electronics
- screwdrivers – different sizes


Materials
- carpentry glue – a kind which can be mixed with water
- old varnish stripper in gel
- woodworm killer
- sandpaper – of different grain size – coarse – 100, medium – 500, fine – 1000
- wood filler – acrylic is the best
- lacquer
- veneer – the same colour and texture as the oryginal cover - accesible in some wooden shops or at carpenters
- painting tape
- modelling enamed paint in black, brown

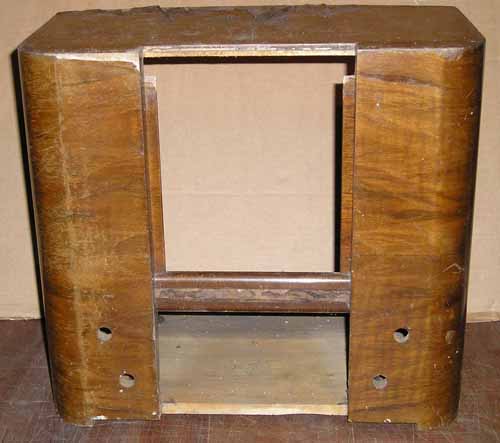
Dismantling
You begin your job with dismantling all interior elements (chassis, speaker, knobs). It is very useful to take some photos of the inside and the outside or drafts showing the details of the radio structure. You need to mark the electric connections which must be disconected. It will be useful while putting the elemens together. Remove the emblems gently. If the lower bases are in different colour than the whole cabinet, you would better take off too. It will be easier to paint them. At the end you get rawed cabinet.


Woodworms
If you can see small holes in the surface of the cabinet and dust cames out of them, that means woodworms are inside. You must kill them, otherwise the whole work will be lost. Fortunately, there is a simple solution. You only need some woodworm killer (accesible in paint shops). Use it according to the manufacturer’s recommendations, that is apply the killer using a brush or inject it into the holes using an aplicator. Next, put the cabinet into a plastic bag, seal the bag tight and leave it for 2-3 days. Finaly ventilate the cabinet. In this way the woodworms are off.
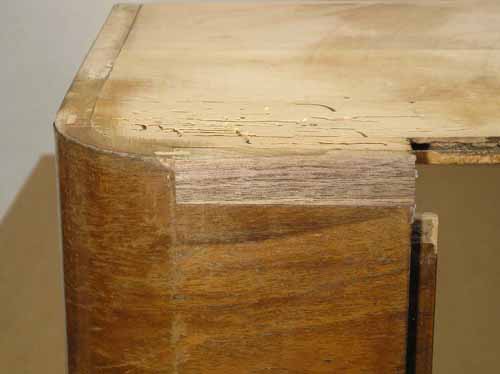
Jointing splits
First of all, you need to have a thorough look of the cabinet. Pull by the walls, look at all joints and edges. If you notice any splits, you should joint them back. Put some carpenting glue between split parts of the cabinet using a small brush or a stick. If the aperture is narrow, use a syringe with a thick needle. Glue used into a syringe should be thin with a drop of water.
Notice: A syringe with glue must be kept in water (otherwise the glue will set in) and washed accurately after the work.
Press the jointed elements using carpenting presses and leave the cabinet for several hours till glue dries up.
If there are many splits in the cabinet, joint them one after another.

Removing old lacquer
Use a special stripper (in gel) for removing the old lacquer coating. The stripper makes the lacquer soft and easy to remove. Cover part of the surface with some gel, wait several minutes and strip the softened lacquer with a small scraper. This way, bit by bit, you will remove the whole lacquer from the surface of the cabinet.
Next, youu have to clean the whole cabinet using a hard brush and some warm water with a soft detergent. Clean the inside and outside of the cabinet thoroughly and accurately.
At that moment make sure that the veneer is well fixed to the walls of the cabinet. Examine it closely. If blebs appear in the surface of the veneer, mark those places and repair them according to the procedure described in the „Repairing veneer” chapter.
Notice: Blebs may disappear when the cabinet dries up. Do not be cheated, such places must be repaired anyway. If you do not do it, they will become visible later and they will make the cabinet ill-looking.
Repairing veneer
This is a key part of the work. You should do it with a particular accuracy and precision. If there is any place in the surface where the veneer comes off, you must fix it. First, spray some water onto the surface of the veneer. Damp veneer gets flexible and easy to press. It should be damp but not wet. Too wet makes the glue thinner and the joint weaker. Inject some glue under the veneer as far as possible, not to leave any untreated space, cover the surface with a piece of plastic foil or paining tape, a straight smooth lath ontop and press it using presses. If you do not put any foil or tape, the lath will fix to the surface. Of course, you do not want it. Moreover, the lath must be smooth, otherwise its texture will be stamped in the surface of the venner. Use the above method for all places where the venner comes off.


If there are blebs inthe middle of the wall, damp the veneer and cut it along the texture using sharp knife. Inject some glue under the veneer, put a piece of foil, and then a lath and press it. After drying up, the cutting will be hardly noticeable. You can fill it later if needed.
If there is a loss of veneer, you must make an insertion. Cut out and remove the damaged piece of the veneer shaped rectangularly. Prepare a sheet of new material of the same or similar size, colour and texture. Apply some glue, put the piece into its place, press it and leave for drying up.
Exchanging the veneer on the whole wall surface is more difficult. First, you must remove the old veneer. An electric grinder and some coarse abrasive paper are useful. Prepare a piece of veneer a bit bigger in size than the wall. The direction of the texture of the wood is important. Of course, the original direction should be kept.


If you have to joint two pieces of veneer, use a piece of painting tape. Apply some glue onto the surface of the wall, put the sheet of veneer and press it. In that task, the most important thing is to press equally. You can proceed following the picture bellow. Use an even table surface, a piece of a thick board and as many as possible presses. The tighter such pressing is the better.

When the glue dries up, trim and grind the edges. In the end, sand the surface of the veneer until smooth. First, use coarse, next fine sandpaper. That is a very work-consuming action. If you have an electric grinder, use it. Do the last sanding manually in order to avoiding making crosswise scratches, which could spoil the whole effect.

Filling
Small veneer losses, woodworm holes and unevenness should be filled. To this aim use some acrylic filler for wood. You have to select the proper colour. Fillers are available in various colours and may be mixed together. You can also add some powdered wood stain or tubed acrylic paint. The latter mixes well with acrylic filler, but do not try to add any enamel or oil paint, as it does not mix with acrylic filler. When selecting the colour, remember that the filler will get a bit lighter when it has dried up. Use a small spatula for filling all holes and depresions. Do not apply more filler than necessary, otherwise you will get tired while grinding.

When the filler has dried up, sand the surface using some fine sandpaper marked eg 400-600 spread on a wooden block. Only in this way will you get the sutface smooth. Sand only along the wooden texture. Do not use an electric grinder with an abresive ring, because it makes crosswise scratches, which are ugly and difficult to smoothen.

Apply another coating of the filler after cleaning the whole cabinet. Vacuum cleaner is really useful. Sand it again and then clean. After that damp the filled places with water and look at them against the light. Damping the surface improves the contrast and makes all the roughness more visible. If you still see rough areas fill them again when the surface has dried up. On average twice or three times filling is sufficient. Filling is work-consuming, but necessary.
After that, clean the inside and the outside of the cabinet using a vacuum cleaner and a damp cloth and leave the cabinet for 24 hours as a minimum.
Look the cabinet closely. If the surface is smooth, you can start lacquering it.
Lacquering
First of all, you have to decide if the cabinet should be shiny or mat and select the proper lacquer. Choose good quality lacquer, buy a small tin. About 100g is enough for one radio. If the surface looks good, without stains, use a colourless lacquer. If the surface looks a bit worse, use woodstain or lacquer containing wood stain. The good thing is that it masks some differences of the colour, but does not cover the wood texture. The colour of the wood stain should be well-matched with the colour of the veneer. It should be this same colour ot a bit, not much, darker.
Apply 3-4 thin coatingsof the lacquer. The first one should make the ground film, for which use this same lacquer but mixed with some (20%) solvent.
Apply the lacquer with a brush, first the nooks and hollows, the edges and in the end the flat surfaces. Brush along the wood texture, make the lacquer coating as thin as possible. Otherwise streaks and stains may appear.

When it has dried up, sand each coating with some fine sand paper. Sanding is meant to remove particles of dust, which settled while the lacquer was drying. Examine the smoothness by moving your hand over the wooden surface.
Some radios contain brown or black painted elements. Paint them last thing using some modelling paint (available from modelling shops). Such enamel paints coat surfaces well and are easy to use. A few mls is sufficient for one radio receiver.

Some raios have the back edge of the cabinet painted brown. That should also be coated last thing with some modelling paint.
Radio montage
When the last coating of paint has dried up, install the bases, emblems and other details. Clean the interior elements, repair the and restore them.
Install the loud speaker, electronics and other parts. The photos and drafts which you took while dismantling prove usefull now. This way you have reached the end of the work.
Since that moment you can delight at the glitter of your beautiful radio.


Thanks to Ula Zochowska for help in translating the text from Polish to English.
To thank the Author because you find the post helpful or well done.

Thank you very much for taking the time to show us how this is done!
Do you use a grain filler before lacquering the cabinet?
To thank the Author because you find the post helpful or well done.
Gratulacje

Congratulations Marek
for your fantastic work and for your so detailed description.
You have restored your radio set, keeping as far as possible its originality and finishing.
This shows your skilfulness and knowledge about these materials. Have you learn this by books (hobby, home work) or have you learn these methods in a school?
To thank the Author because you find the post helpful or well done.
Thank you for your kind replay
I answer: I have never used a grain filler.
I have learnt such methods myself. I mainly use the Internet or books. Next, I try what is the best thing for solving particular problem.
To thank the Author because you find the post helpful or well done.
Lacquering with Gomalaca

Congratulation Marek,
It’s look like a good manual
I learn something new.
My teacher in wood (old school ) use “gomalaca” shellac when lacquering
It’s made in-house in rate of 100/200gr. of shellac in solid way (scales) for one lt. of alcohol.

Mix in a bottle and wait for a complete unify
The shellac the have some shade ( without color , amber , blonde …)
It’s not fast to use because have apply many layer and wait between them.
Other think do not use brush but “boneca” doll, is a small cloth rolled in round form in the smooth part applies shellac
Is result in old style and old fashion
Best Regards
Hernâni Capela
To thank the Author because you find the post helpful or well done.
Wipe on Poly
Count of Thanks: 37
Thanks for the great article. What is your opinion of Wipe on Poly? I used on an old Walnut Case Radio. I applied 4-6 coats with a cotton rag. I rub like a wax. Have I deviated too far from the Laquer, or is this considered an acceptable product?
Attachments:- Wipe on Poly (42 KB)
To thank the Author because you find the post helpful or well done.
Woodworm
Just for emphasis
Most veneer will not take any power sander. You need to do sanding by hand. Or sometimes cleaning, rub with very fine wirewool, leaving most of the varnish and then spray with clear acrylic lacquer used to finish car metallic paint.
Only if the wood is bad or all the varnish is "crazed" and cracked do we then need to strip to bare veneer. Some people use "nitromors" and then a special scraper to take off old material. I use the back of a knife blade or scissors to scrape without scratching the veneer.
Woodworm
Note that many woodworm treatments only prevent re-infection, they may not kill the grubs in the wood. Most of the holes are exits of "worms" that left and turned into beetles, which live only a few days. The grub/worm stage can be five years.
What does kill them (common Furniture beetle only)?
- Drying the wood to less than 11% moisture content
- Repeated quick freezing to below 20 C (Chest Freezer?). Ordinary frost doesn't hurt.
- Heating the wood to more than 50 C
- Ordinary Paraffin (but difficulty is soaking the wood enough). Presumably Kerosene, Car Diesel or light home heating "oil" are all similar.
- Serious dose of Radiation (done on valuable violins etc). I think about 10,000 RAD needed, so don't try it at home :)
- Gassing. Only for Expert companies. Can be warmed nitrogen to asphyxiate them or actually poisen gas. Professional companies can "bag" and seal an entire building. May be needed for Death Watch beetle in structure as any injected or paint on treatment is totally ineffectual.
Most Professional fluids are a mix of not very effective Insecticide, but very effective fungicide. Fungal infection encourages all wood boring insects, especially the "death watch beetle". Their main feature is killing eggs and stopping the beetles laying in future. The eggs are very small, but cluster is visible if on the surface of bare wood.
Fresh "sawdust" (Frass) after freezing or heating or working on cabinet doesn't mean the grubs are not dead, it can be old Frass loosened. The "Sawdust" or frass really only comes out of EMPTY flight holes, not places with worm as ingress is tiny and the Frass is the digested wood passed through the grub. So really the "Frass" or dust (actually the droppings) only tells you that a "worm" changed to beetle and left. But the hole tells you this.
The beetle won't generally lay on varnish or painted surface, but in an old hole, crack/join or bare wood. So filler all holes and cracks. Then varnish the inside of cabinet with satin finish to make it look subtle and not "over finished".
Prevention
1) Borax is cheap, quite safe, effective and easy to apply, a compound of boron also known as sodium borate. This is available as a crystalline powder, which is dissolved as a 15% solution in water and applied to the affected timber. There are no health hazards* associated with this treatment, and borax will inhibit fungal growth as well as killing woodworm. It should be done annually for 5 years in area with a lot of timber that had a past infection to prevent any "hatching" beetles laying.
2) Dry. Woodworm needs damp timber to thrive. Below 15% moisture content is difficult for them and below 11% it probably dies. Put a de-humidifier in any damp storage area for a month or so. Thicker timber takes longer to dry
(* Borax Health hazard: Unless you are pregnant and eat about 1/2 cup of the powder in one go. Unlikely. Even then the baby might be just slightly reduced in weight)
To thank the Author because you find the post helpful or well done.
woodworm

Carbon dioxide might also be mentioned for killing larvae. There is some good information on the "care and feeding" of woodworms here.
To thank the Author because you find the post helpful or well done.