Pictures perfectly with Irfanview 3.98 or 4.00
Pictures perfectly with Irfanview 3.98 or 4.00

EE Nov. 5, 2014: Now easy because the server does the work of reducing to max size of 1400 pixels and manages the KB.
Quality begins with taking the photo:
Please show the 3 dimensions for your first picture, don't take it frontal. Take also name plate or sticker, scale, knobs, rear, schassis. If you do a repair also the wiring - before repair!
You can add pictures to a model if there are already some!
Preparation step by step:
Download free from Irfanview. If you have not Photoshop (Elements):
------------------ ----------------- -------------------- ------------------------
File open
Source select (search in…)
Picture select, open
If the picture appears too large on the screen, possibly make smaller (-)
in order to make it completely visible.
Cut out, if necessary (the model should be almost format-filling): position the cursor at the upper left corner of the desired format, mouse-click hold and pull to the desired lower right corner. Release: a rectangle shows the selected cut-out.
If the rectangle would not fit, it can be removed again:
set cursor arrow outside of the rectangle, mouse-click removes the rectangle.
If the rectangle is acceptable, click Edit -> Crop selection.
The cut out will appear.
Save as - or better "Save for WEB" (you can then reduce quality to 80 %)
select store location (destination)
Type of file: select JPG
adjust quality (usually 80%) in the extra window at right and remove there all markers.
change Name if required (convention! here for example: SRA_28_RadiolaM60)
save
The picture is ready for upload.
Note: most steps are revisable
- edit
- undo
-------------------------------------------------
Good luck!
For professionals further steps are possible if needed:
If necessary, modify brightness and contrast:
click instruction "image",
select "enhance colors"
optimize picture with the sliding controls, 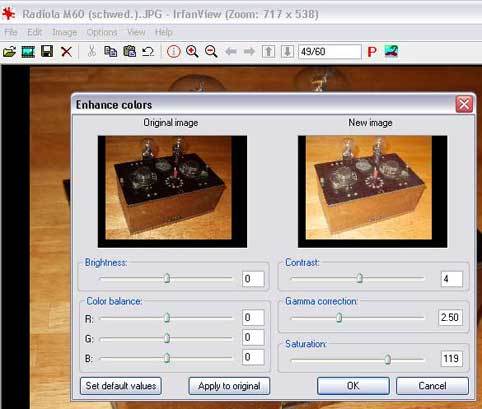

Apply to original, OK.
click again instruction "image"
Modify picture size by "Resize/Resample", if it is > 1400 x 2100 pixels - but not really necessary because the server does it. I do because Irfanview or Photoshop do a better job than a server ...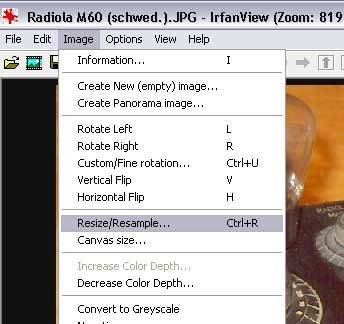

To thank the Author because you find the post helpful or well done.
Thank you, Question
Thank you for this information. I installed this program today and used it to prepare three photos for the forum.
I have a question about photo file size. You suggest a photo file size of between 60 and 120k, but when I click on the "i" button it recommends a file size of 40k. Can you provide more guidance on photo file size? Maybe I'm mixing information for photos for different applications within the museum.
Thanks.
Paul
To thank the Author because you find the post helpful or well done.
Good luck,
KoBi
To thank the Author because you find the post helpful or well done.
How to upload a picture to the database of RMorg?

Pictures for model pages
See also this link.
You search your model and then do a mouse over at "Uploads and questions" and select there "Picture upload".
You get a small window with a Help button top right and the most important information about sizes etc. directly visible.
Then you select your picture in your computer with the button besides the field "Where is your picture?"
After that you tic either "Picture from another source" or if it is of your collection "Picture from my own collection". You might have lost or sold the set but it was yours ... is also acceptable.
You then can add a capture (legend) - but you can also decide to change the default for "Printable" or "Copyable". If you choose "Copyable = yes" then also guests can click to big size and they can also copy your picture ...
The send button will bring your image to the server and after hours or a day (or so) the model admin will have activated the picture. It might be missing for another day due to our process for getting more static pages.
The content of the blue help-info button:
You might see an error message immediately or your system is now loading up - If all went well you see a new pop-up with a confirmation.
An activated picture is shown on the model page plus in your personal "Collections" area if you had clicked "Foto of my collection".
ERROR?
In case you often get errors, it may be that your picture tool is not really compliant with established standards. Try the freeware at www irfanview.com of Irfan Skiljan, Vienna. If errors occur rarely: Edit the picture again and cut it only very slightly smaller. Replace the old one with it and try again.
[imageupload.form.cfm english ]
To thank the Author because you find the post helpful or well done.
Picture guidance

To thank the Author because you find the post helpful or well done.
A tip for easy handling of point 4.1

Dear friends:
Instead to make an exact rectangle and delete if dont fit, just make any rectangle and move each side to the right position by using the double-arrow that pop-up when the mouse is over the side-line, then left-click and move.
Easy and accurate.
To thank the Author because you find the post helpful or well done.
Reasons for our photo resolution of 933 x 1400 pixel, 180 KB
I sometimes get complaints that our sources are not good enough, for instance picture size in pixels or memory allowance. I'm tired to give individual answers and would like that you pose such questions into the "Talk" board of the forum. Then I can take my time and give a decent answer - if necessary.
We show quite more than a million pictures. About 500 000 are schematics with a maximum size of about 4000 x 6000 pixels and 600 KB for PNG for sharp (abrupt) color changes (writing, schematics etc.). Most ordinary pictures are in JPG, which standard was created for smooth changes (mainly photos). Here I refer to the photos in JPG, mainly model pictures.
NOTE: since 2014 this is OLD STUFF: Picture size is max. 1400 (please use it!) by 2100 hight and 600 KB (accepts also a bit more).
There are three main reasons for our picture size:
1 History and sources
Pictures are never big enough - if you want to have them or to look at!
My budget in hours and money is not big enough for adapting all the new possibilities.
I started this crazy venture in 1999 (first ideas in 1998). Can you imagine the IT world in that time?
Nearly every web page was static - not us. That was not my way. But I faced big difficulties to find programmers for that! Three attempts in vain... Spring 2002 was then the good restart. The first 3000 pictures were from my books and also the first 24 000 models - with shortened data.
We started with a width of 700 pixels and since quite some time it is
933 pixels width and a maximum height of 1400 pixels.
Screens and cameras:
Reason for 700 pixels of "the old time" is:
Computers had a screen width of max. VGA 640 x 480, later SVGA 800 x 600, then XGA 1024 x 768. Sometimes one had the task bar at the side, resulting in less than 1000 pixels width. The ratio of photos was 4:3 (not 16:9). With a width of 700 we arrived to 933 pixels in height. To serve also the present 30% of users with screen size 1024 and smaller, we then amplified to the 933 width, urging the members to use it fully! Often members still have cameras which can only get 640 x 480 pixels. Until a short time this was the maximum (1 Megapixel) anyway.
Printers:
Printers can print out roughly 740 pixels wide on a A4 page portrait.
Therefore our width of the pages is 741 - just fitting into a printed page. But on the screen we can opt for a banner at side of our space - still within the 1024 screen.
Today our width is allowing to have two pages side by side on one screen, very important for direct comparisons, specially for the admins if they use a HD or even SUXGA (1920 x 1200) screen.
I even use three screens and just try WQXGA with 2560 x 1600 pixels. Until shortly the notebooks had much smaller screens and pictures should also fit there.
2 The rich and the poor
The IBM XGA standard was first published in 1990 but it took quite some time until expensive screens could be bought in this size. Most users had probably even in 2002 screens with 1024 or often lesser pixels in width.
Our decision for max. 933 pixels width.
In a good application you never have to do a horizontal scroll (sidewards), only "normal scroll". According to Wikipedia (June 2012), the most used (18.69 %) size is still XGA with 1024 pixels wideness, minus sometimes a vertical bar ...
Fact is that users have the following sizes for screens:
640 1%, 800 6%, 1024 21.7%, 1280 43,7%, bigger 27,7%.
Motigo Webstats shows us (for us?) the following: 640 and smaller 3%, 800 8.3 %, 1024 17 %, 1280 34 % and bigger 37.3 %. We respect our users who can not afford more than 1024 pixels.
3 How do members work?
We saw the main technical reasons, now we look into the daily practice of our members.
Fact is - and this matters even more than the technical reasons above - that most members load up smaller pictures! This for different reasons:
The two main reasons:
Either the members don't follow the link FAQ on the main page (HP) and there the illustrated step-by-step HOWTO article for pictures treated with the free program Irfanview or they have not a better camera.
Probably the most important:
Members don't know that they have to use "save for WEB" and no other method, because with "for WEB" the tool offers to change the JPG quality to get big sized pictures to under 180 KB. They first try to load up the picture they get from the camera, not reading anything ... They face too many KB and therefore a rejection. Then they reduce the pixels until it fits ... We have since a few weeks stopped this by not allowing own pictures less than 500 pixels width - and actually should go to 650 as a minimum to avoid this.
The second "crime" is to take the first picture of the set frontal instead of showing the 3 dimensions as you see it by nearly all ads of the manufacturers! You get quality only with a minority! Most members will not read the instructions, most members do only care what they get and then it is not enough - but do not care what they bring. Most complaints or questions come from members who have never uploaded! That is my side of this project ...
Why don't we reduce pictures to the desired size by the server?
We did so and received very bad results when the reduction was big.
It also takes too much processor time, could be an argument.
I often receive pictures from guests which are too small and when I ask for big ones I get pictures with 8 MB - no JPG reduction at all. They just don't know or are too lazy.
Comes the last question:
Why do you not allow more memory like 6 MB or so?
Since a short time (some years), server HDs were quite expensive and offered much lesser space than PC HDs - as one obstacle. The second is: We need to do daily back ups etc. which need quite some bandwith since this has to go over the Internet. By delivering more than 200 000 dynamic web pages a day to the public, we already face quite some cost. This could be a multiple of today with bigger sizes. But this is even not the main reason!
Most members would then not care for quality but just upload the camera picture without (tight) cropping or quality reduction. More and more it would be quick shots made from a handy mobile camera: Trash.
Can you help?
I invite you to look up the daily list "New pictures" and check the sizes - when you see that a member (of your tongue) loads up small pictures or pictures with a small object instead of cropping, then please send him/her instructions and motivate to do the pictures at max. pixel size, crop them tightly, bring detail pictures like scale, knobs, labels, chassis, name plate (most important) etc. and take the first pictures with 3 dimensions.
This would be a big help. Well, it is only my dream, sorry ... The rich and the poor with a different meaning ...
To thank the Author because you find the post helpful or well done.
 Thread closed by a moderator. But replies can be made through a moderator.