Good Photographs; Photo Technique for better pictures
Good Photographs; Photo Technique for better pictures
Good Photographs; Photo Technique For Better Pictures
Better pictures with only reasonable effort
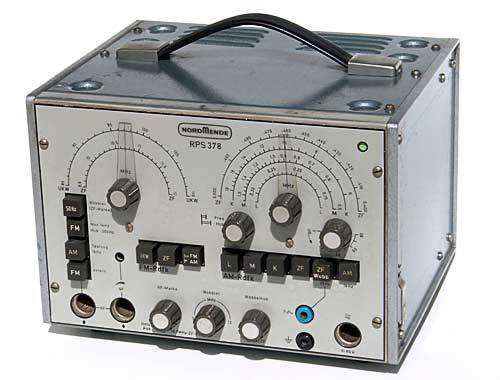
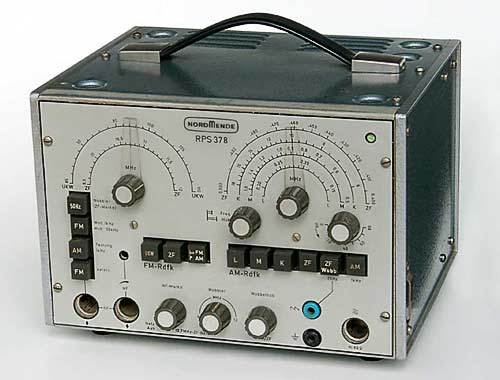
It takes only a few, simple tricks and photo technique to create good quality pictures suitable for uploading to the respective model page. This can be achieved without expensive photo equipment and/or sophisticated editing software. At the example of a test transmitter, it is described hereafter how to create above average quality photographs using a digital camera and applying minimal effort.
Required Set-Up
When taking pictures of objects, it is advantageous to do so in front of a non-glare, white or light-coloured background. This can easily be achieved by using white cardboard. The only disadvantage of this low-cost solution is that the cardboard is more difficult to keep clean and tends to suffer some damage through repeated use. A better choice is thin, possibly 0.8mm, white melamine resin high pressure laminate as used in the furniture industry. It's available under various brand names in every DIY or other building material store and at reasonable cost. A sheet with the measurements of 100 x 120 - 150cm / 40" x 48"-60" will generally suffice. Such a sheet of material can easily be stored away when not in use as it will fit behind most pieces of furniture. It is also flexible enough to adjust its shape to the weight of most radios. Its non-glare surface is kept clean with any mild household detergent. White linen or similar fabrics are not suitable as the unavoidable creases create undesirable shadows.
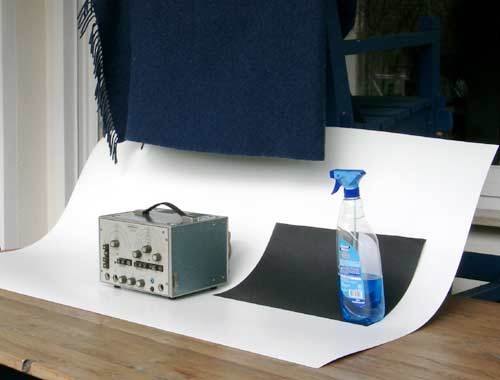
The picture above shows the set-up used in this case. It's on the patio with a lawn chair replacing the non-existing wall needed to support the back of the white background material.
The camera is mounted on a tripod in front of the table. A relatively inexpensive digital camera will be sufficient as the resolution for pictures intended for the RMorg should not exceed 933 x 700 pixels. Good results are achieved by taking the pictures at a slight angle of about 15 degrees, and ever so slightly from the top by perhaps 6 - 9 degrees. To avoid, or at least reduce perspective distortions, it is recommended to keep a greater distance to the object and compensate for it by applying the (tele) zoom function of the camera. Mobile or cellphones are not suitable for this purpose, as pictures taken with these devices are usually of poor quality.
Lighting
Proper lighting is the prerequisite for a satisfactory outcome. 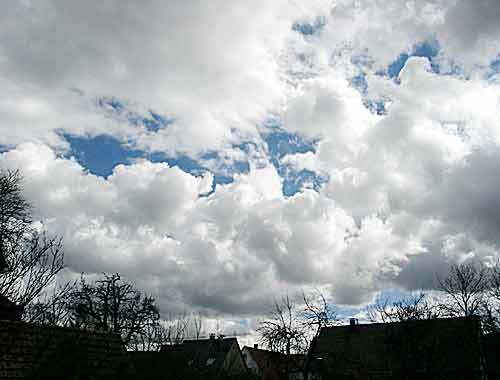
A day with a clouded over sky generally renders best results. Direct sunlight should be avoided as it creates unpleasantly harsh shadows. (as an example, see the next picture).
Of course, on a bright, sunny day, one could move with picture-taking into the shade. That, unfortunately, is not the solution as one would encounter a light that gives pictures a bluish tint. "That effect can be at least partially remedied by invoking the "White Balance" feature available as a manually adjustable control on many digital cameras. There is usually an "Auto" setting that will adjust white balance and overall colour balance automatically in response to prevailing lighting conditions. However, it pays to experiment with different settings until the most suitable adjustment has been determined. And, of course, the object to be photographed should have been placed in its position prior to getting the camera ready for the picture taking."
Preferably one waits until the sun is behind a cloud. Shadows will be drastically reduced while the picture still appears three-dimensional. Pictures taken on a heavily clouded day may show so little contrast that the results could be called "flat". This can and should be subsequently corrected via suitable image editing software. Photo Shop (light) and freeware such as IrfanView come to mind. Practically all programs currently on the market provide the necessary tools to adjust contrast and brightness. More sophisticated software will allow for more graduated corrections. Some have the "auto-contrast" feature that may also lead to good results.
Reflections
The white background, and its set-up intended to emphasize the object to be photographed, is accompanied by an inherent disadvantage: it is often reflected in the surfaces of the top and side of the radio cabinet. This effect is especially pronounced on dark-coloured, highly polished cabinets. Affected surfaces appear white or in light gray tones, completely hiding the fine wood grain of an otherwise beautiful cabinet.

This effect can be counteracted by employing so-called "black flags", a term used by experts to describe dark material to prevent reflecting. In the set-up shown further above, a dark blanket (over the lawn chair) and a sheet of heavy black paper serve as improvised "black flags". The correct positioning must be determined through the viewfinder of the camera. In choosing the colour of the material, you can hardly go wrong by picking black. However, under the right circumstances, brown might give you an even more pleasing wood tone. If at all possible, a small white edge should remain around the object. However, sometimes it's unavoidable to let a "black flag" encroach on the picture. Such black areas can easily be removed later on using almost any editing software.
Results
The result, as shown above, is quite an attractive picture which differs positively from any snapshots taken in the shop, garage or flat. And it did not cause any great effort or expenditure. For perfectionists, of course, the fine honing commences now. In most cases this will not be necessary keeping in mind the end-use of the "product". Not to be overlooked, however, are the RMorg requirements: a maximum of 933 x 700 pixels for model pictures and Forum pictures not to exceed 500 pixels. Most image editing programs will allow you to "size" or "resize" your pictures. Also, almost all cameras let you adjust the resolution of pictures to be taken. If so, choose the 800 x 600 setting but be aware that it may curtail your opportunities to excerpt the desired portion of the picture.
Another RMorg requirement is to upload pictures in the .jpg format and to limit the size to not more than 100Kb.
(Many thanks to Alfred Zeeb for the translation)
To thank the Author because you find the post helpful or well done.
Great Appreciation to Martin, Fred Zeeb, and Ernest Erb
They have provided invaluable tips and techniques that make the graphics of the Radio museum a "Standard of Excellence" in the technical data and in the presentation thereof.
Respectfully,
Robert Sarbell
To thank the Author because you find the post helpful or well done.
How to scan and to process scanned documents
You can also help for clearness by using "gamma" on a better processing program - or for Photoshop you use Image/Adjustments/Curves ... and do the following to get rid of gray parts from old paper etc. after changing from color to gray scales.

In the attachment you see a this way processed schematic in .PNG and how our system presents it as .PDF - since guests can not open such schematics on model pages.
See also the articles which show how to process schematics with Irfanview (and Photoshop). Attachments:
To thank the Author because you find the post helpful or well done.