Schematics perfect with Irfanview 3.98, 3.99 or 4.00
Schematics perfect with Irfanview 3.98, 3.99 or 4.00

See here information about the max. picture formats.
Irfanview is a Freeware (for non-commercial use) graphic viewer program which offers suitable image processing.
Please follow the given sequence step by step to avoid quality loss !
Important: Different sequence could dramatically degrade the result !
Note: The processing of schematics needs a good basic scan.
I would recommend min.300 dpi and b/w photo (not fax or OCR !).
The dpi figure can finally be reduced as appropriate, just not to lose details like thin lines and component captions.But a higher resolution is necessary to start with.
1) Download from this site "Irfanview com"

If You want to select a different language --> Options --> Change language
Bear in mind that the pictures here are from the English version!
2) Open file (or click the very left yellow symbol) and select the subject file to be processed (search in... )
3) Rotate
--> View --> Display options --> Fit image to window
if rotation is required: a fraction of a degree is often sufficient (e.g. 0.2° or 0.5°).
To rotate left (CCW) the value has to be negative (-).
--> View --> Custom (Fine rotation)

Images in landscape format please rotate left (to portrait format)
--> Image --> Rotate Left
4) Cut out
--> View --> Display options --> Fit image to window
Now You can see the full image.
Keep mouse click (left) depressed and draw a close rectangular frame around the desired image part to cut off unwanted margin.
--> Edit --> Crop selection
If You are not satisfied You may cancel the selection for a new attempt. Just click outside the frame (not outside of the image) and try again.
5) Image size
If the image size is below 27 x 19 cm, then increase it by using more than 300 DPI. Normally the Resolution is sufficient with 300 dpi.
The image should be larger than 27 x 19 cm. It can be up to 6000 pixels - if it fits into 600 KB.
6) Greyscale
--> Image --> Decrease Color Depth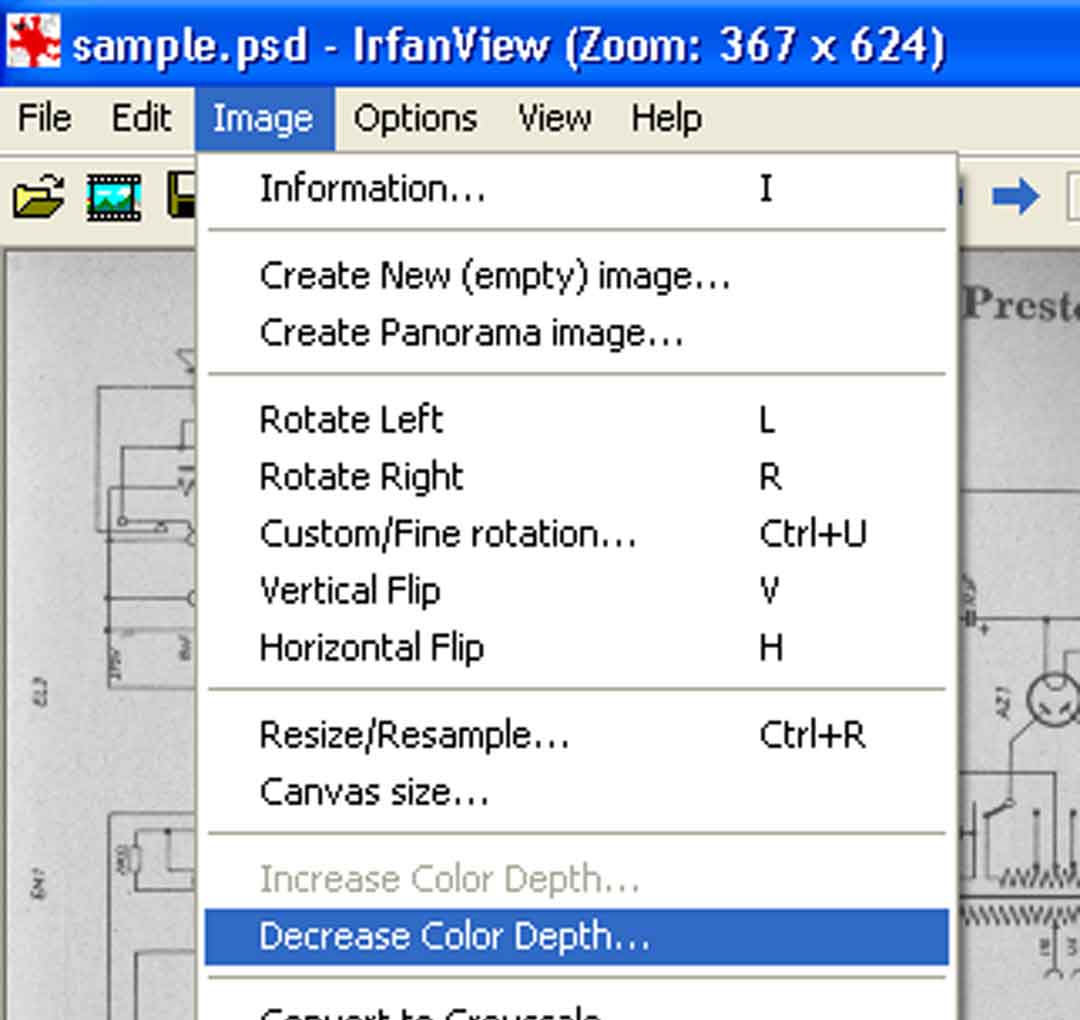
Set shades of grey (4 or 6 recommended)
do not activate Floyd-Steinberg Dithering !
7) Background
---> View --> Display options --> Fit window to image
(will display 100% to provide optimal result control)
click --> Image --> Enhance Colors
We shall aim for crisp contours, a clean white background and deep black
lines using the Contrast and Gamma correction controls.

You may check the full size result by --> Apply to Original
7a) Improved background
Click --> Image, select --> Palette and --> edit Palette and
--> double click on the lightest (here white) square

then --> click the white square, then ok.
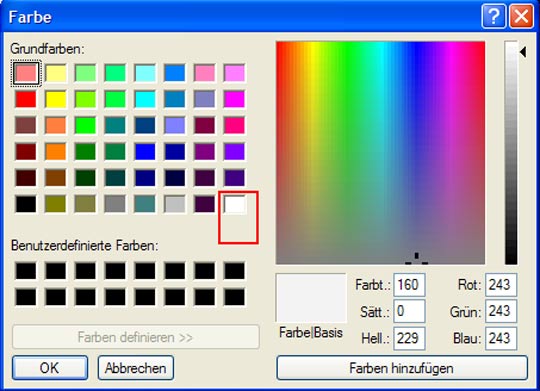
and the background should be snow white !
Use png format please and select Your desired store location.
Important: please mind the correct designation, and use abbreviations to keep it short:
Country_manufacturer_model_doc.type
For example:
d_aeg_opus_2430_sch1 = complete SCHematic
d_aeg_opus_2430_sch2 = another complete Schematic
d_aeg_opus_2430_sch1a = left hand part of a divided Schematic
d_aeg_opus_2430_sch1b = right hand part of a divided Schematic
d_aeg_opus_2430_align = Alignment
d_aeg_opus_2430_cord = Cord stringing
d_aeg_opus_2430_lay = Print layout, also 1, 2, ...
d_aeg_opus_2430_prts = Parts list, also 1, 2,...(C + R)
d_aeg_opus_2430_spare = Spare parts
d_aeg_opus_2430_descr = Description, also 1, 2, ....
d_aeg_opus_2430_titl = Title page of Service manual (with picture)
d_aeg_opus_2430_data = Data (e.g.Tube lineup etc.), no picture
d_aeg_opus_2430_pos = Position plan (of components), also1, 2, ....
d_aeg_opus_2430_wire = Wiring
d_aeg_opus_2430_mech = mech drawing, exploded view,etc., also 1, 2, ...
d_aeg_opus_2430_misc = Miscellaneous, (try to aviod please)
Try to avoid repetition of similar suffices. You may choose others, but they must be self explaining to the user and as short as possible.
8) Save
Now the file can be saved by --> File --> Save as
Very important: Finally check the resulting file size. An average of 150 kB is ok. In an exceptional case a very detailed file may have up to 350 kB.
Careful application of the background processing (7 and 7a) can dramatically reduce the file size without any quality loss.
Removal of grey background (often almost invisible) is one of the most powerful tools to reduce file size.
Good luck !
(Reedited to add 7a)
To thank the Author because you find the post helpful or well done.
In short for Photoshop

I find that SAMS Photofacts are very easy for us to scan and process. But please scan only Photofacts made up to the End of 1963. After that date there may be a copyright - because the regulation in the USA has changed.
By the way: You may face more difficulties for some few plans made by manufacturers like the model SABA 4000 Automatic Stereo 11 for the USA.
See here what you can achieve with our process which wraps .PNG into a PDF (please click the link above): 16 tubes with 22 tube functions and every single condenser or resistor has its value shown - on one standard sized sheet - within our storage limits of 350 KB! Print it out and get a magnifying glass - or put the size to 400 % and read or print parts big sized ... I show here also a PDF of an old scan for the SABA Lindau Automatic 8 with 12 tubes (290 KB). Thomas Albrecht sent me an other example from the USA, Philco 37-670 to show what can be achieved. Unfortunately not all of the realized 238,677 schematics show this quality (we show 110,357 at present for the USA).
Back to SAMS Photoshop schematics:
1
We scan at 300 DPI. I never split a page but sometimes SAMS puts a schematic to two pages (we call it then 1b + 1b). Please scan not less than with 300 DPI (what ever others write) and keep the paper in line. If possible scan in black and white or change later to gray scales if it is a black/white schematic.
2
Sometimes we cut at the unused edges in order to get the content in a slightly bigger size. But never make the DPI less to shrink the scan. It must have a big size like typically 2548 pixels width and 3317 pixels height. which is about 33" by 46" at a "sreen resolution" of 72 pixels/inch. Our automatic process does the trick by putting it to a printable PDF which you can enlarge to see details up to 400 %. Format is always "portrait", not "landscape"!
3
Then I use the curves in Photoshop (Image/Adjustments/Curves) the following way:
You have 4 vertical "fields" (zones) and from left two zones (in the middle) I keep the bar at the bottom and it will go to top on the 3rd zone and stays there on the top (for the last zone) - if before the bar was from the lower left corner to the upper right corner (a straight line) and the dark field on the left (below you can click it to reverse! - don't). 
With this technique, the schematics are automatically free of gray dirt or of browning effects of the paper.
4
Don't do anything else but now go to "File" and "Safe for WEB". Settings = PNG-8, Colors are then normally already 2 instead of 256. In the color table you see black and white - only two small squares. Click the SAVE button, then you name it and select where to store it in your system.
Now it is ready for upload to RMorg, selecting the right model and "schematics" instead of "pictures" (or so). Our system then puts it into the "envelope" PDF so that it is easy printable and scalable up to 400 % for a closed look or a partial print out.
It is that easy ...
Examples:
1
ID = 56942 = (Sears, Roebuck) Silvertone 7025 with chassis = 132.807-2 - 4 pages:
First the one with suffix "sch": Select 400 % enlargement and you will see: still no pixeling, everything black and white, straight, clean.
2
Now a real complex schematic (not a SAMS Photofact but an original) with the same simple technique:
ID = 21403 = (SABA) Lindau Automatic 8
Please click the "1" besides "Schematics etc.": in red.
For guests:
Since guests can not reach the schematics on the model pages here the example as .PNG (click it to big size) and the example as PDF. Print it out or enlarge up to 400 % for a detail view.
It is a crystal clear schematic for 12 tubes with 19 tube functions on ONE standard sized sheet!
Every item has its number and value ..
I instructed Kathrins daughter on that ;-) She has never before seen a scanner nor worked with a picture program - she just wanted to learn it ... That was in January 2003.
The very rich schematic is below 300 KB ...
Size 2370 x 3336 pixel (x 8 BPP) or in fact size 83 x 118 cm or 33 x 46 inch!
It uses 289 KB space only but has 7.54 M pixel dimensions but as a .png it is only 288 KB without any loss! Our loading/processing forms that automatically in a printable PDF - again 1 standard sheet - ready for print out.
Cordially,
Ernest
To thank the Author because you find the post helpful or well done.
How to upload a schematic to the database of RMorg?
On request I will explain how to upload a schematic - as I have done here for pictures (post 4).
Here I give you also a sample of a most complicated schematic on one page for a 16 tube (22 tube functions) model SABA 4000 Sutomatic Stereo 11 where you can read every part number and value in the plan. Please print it out or enlarge it to 400% as a test - it is just fitting the max. of 350 KB. But we know: To upload good schematics is an art and the most difficult job you can do at Radiomuseum.org.
Schematics modelpages
You search your model and then place your mouse over "Uploads and questions". A select list opens and you move the mouse down to "Schematic upload" and click. The blue info button in the new window will give you further information - but you see now a list of possibilities for your schematic.
With the SchematicFinder we have a very important tool to know what is around for different schematic collections like Photofact, Rider's, Beitman (just to name for the US). See the link on the search page (homepage).
There are quite different situations depending on if we found automatically the model to be joined to the list or if somebody has already uploaded if there is a collection you have the schematics from etc. Generally you click on the first possible radio button and enter some data if possible. If that is not possible then you click one of the other radio buttons, mainly "other collection" and there you give the name of collection. You then click the button continue for part 2. Please read again how to name your document if you have not done so before.
Then you select your schematic in your computer with the button besides the field "Where?".
The upload button will bring your image to the server. You can immediately check the model if you wish. You then can easily load up next pages to that model or the same to other models if this applies. The schematic admin will check later and may contact you if the schematic is not done as we request to give you good results when you look for one.
ERROR?
In case you often get errors, it may be that your picture tool is not really compliant with established standards. Try the freeware at www irfanview.com of Irfan Skiljan, Vienna. If errors occur rarely: Edit the picture again and cut it only very slightly smaller. Replace the old one with it and try again.
To thank the Author because you find the post helpful or well done.
Irfanview menus

Hi:
Some menu options are different for current version of Irfanview (4.27) so you may like to revise these excellent intructions (step 7 especially "enhance colours" is now "colour corrections")
John
To thank the Author because you find the post helpful or well done.
Full manuals, large files, PDF
Count of Thanks: 72
Hello Sir,
For some models I can contribute, the manuals are already complete PDF files. In some cases it is not possible to extract the schematic as an image or as a single file/page because it can be complex therefore large pixel-wise. In other cases the manual could be very large like 120MB.
What would you like me to do, to upload these interesting items? It would be best for some of the more complex gear (like the Hughes Memo-Scope) to upload the whole manual, but for others, the schematic would be enough.
Thank you
Patrick Jankowiak, Dallas Texas
To thank the Author because you find the post helpful or well done.
PDF Files and New Schematic Formatting Procedure

Hello Patrick,
There are various issues associated with uploading complete PDF files, however the capability of uploading PDF's now exists. If it is not practical to use the standard method of submitting schematics, then please read the following thread, which discusses the issues associated with PDF's and also discusses how to submit PDF files:
For the schematics that you can scan and format, please follow our standard procedure for formatting the schematics that are in this thread.
FYI: I am in the process of updating the schematic formatting procedure using the latest version of Irfanview, and this will be available in a few weeks. I will place a link to the new procedure in this thread once the procedure is completed.
To thank the Author because you find the post helpful or well done.