philips: LD562AB; Colette: Case Restoration
philips: LD562AB; Colette: Case Restoration
Philips Colette LD562AB Restoration Part 2: The Cabinet etc
The cabinet is in three main parts, a plywood main section with Bakelite front and rear panel. All is covered with a Rexine style cloth. Common problems are cracks to Bakelite, tears etc in cloth, damage to hinges, cracked / missing parts on plastic mounts for the aerials, broken ferrite rod, damaged telescopic aerials, corrosion to case or chassis parts from leaking D cell. The ferrite in my set is fine as are the hinges and door locks but all the other types of damage exist. The Annette uses a curved plastic scale which is often cracked, but the glass plate with two knob holes on the Colette seems more robust. Mine is fine.
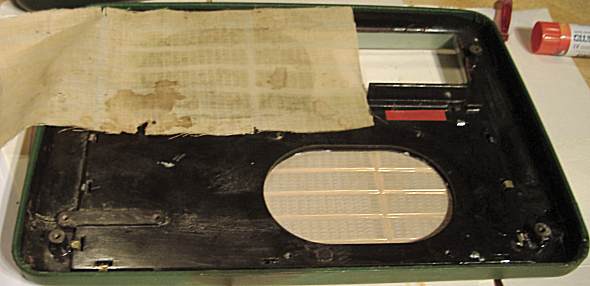
Other cosmetic issues are paint missing from panel at controls and the speaker cloth is damaged/discoloured. The grill is also loose with most of the tabs missing. The screws mounting PSU are missing.

Broken Left corner (five parts but none missing!) and poor speaker cloth.

Hole in case above flap, damage to cloth.


Bottom corner cracked off under cloth, Aerials and mount broken.

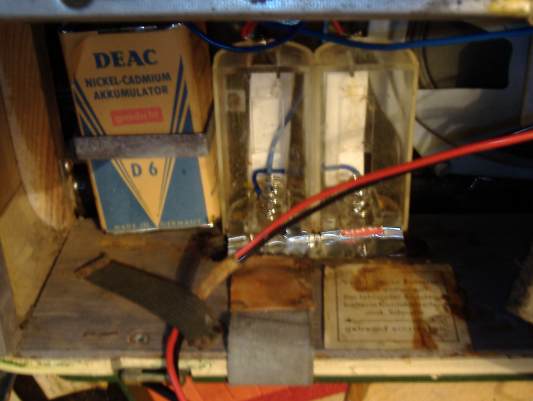
Corrosion in Battery area

Clip for "D" cells holder is scrap. wood corrodded badly at mounts.

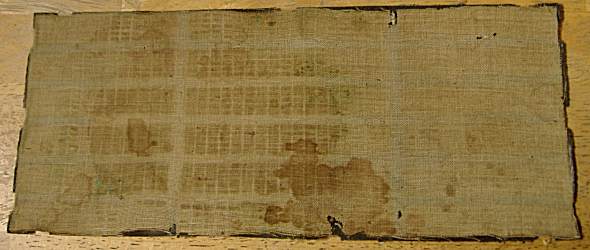
Cloth badly stained and damaged.

Nine tabs missing from speaker grill!
Removal of chassis from case.
Remove PSU (some slack on cable), brackets on dual D Cell holder, DEAC and aerial fittings. Two screws hold the main chassis which slides out. Unscrew loudspeaker. Four screws hold the front panel to the body of the case.
Bakelite Repairs
Tape over large holes at front with a tight piece of parcel tape and fill from rear with David's Isopon or other polyester based car body filler paste with catalyst. Not Fibre glass resin! On setting the tape peels off with a smooth surface,
Clean and dry cracked parts and check assembly order. Put superglue on both surfaces and allow to soak for a minute. Position parts lightly then breath on joint to make it damp and press hard. Hold for a minute or two. Superglue sets slowly on Bakelite with poor strength. Damp accelerates setting. After about 10 minutes mix two part epoxy and smear on inside in a thick layer, angle part so it collects most over the cracks. Perhaps use 10min type (but it's much less strong) and gently rock the part to distribute the resin for a few minutes. Any structural parts should use normal slow epoxy for best strength and be "keyed" with rough sandpaper. Surfaces must be very clean, dry and free of grease / oils / soap / white spirit etc.
Cloth should only be glued with PVA wood glue, PVA craft glue or "Pritt"/"UHU" paper glue sticks. Soaking rear with warm water for a few minutes helps. This advice is from a supplier (www ratchford . co.uk) who still make this kind of covering for cabinets, car panels as well as lighter materials for book binding.
Any holes or cracks in the covering are best filled with "knifing putty" sold for filling scratches and surface imperfections on car bodywork prior to re-spraying.

Super glue before Epoxy added.

Lever apart gently and a little superglue into crack.
(Apply Epoxy later)
Covering stuck down with PVA, Epoxy on inside (look bottom right) and inside of new speaker cloth.
Speaker Cloth & Grill
Various possible cloths are Linen or other Cross Stich cloth, Muslin, skirt / dress linings and nylon net curtains. In this case pure white nylon net curtain was the best match. It was dyed cream by scribbling all over with a pale brown "furniature" touch up marker and then wiping with a alcohol soaked tissue to smooth it out.
Pieces of coffee tin soldered to the grill to replace the missing tabs. Lightweight brass sheet might be more authentic. An SMD re-work hot air gun assisted the 25W soldering iron. Pre-tin and pre warm grill and tabs.

Torn cloth stuck, but it's very rough, so add knifing putty and rub down (dries fast)

Knifing putty on front.

Knifing putty on front.

Knifing putty on rear.

First coat of Artist's Acrylic paint applied over smoothed "knifing putty".
Batteries

Base springs off "996" packs dismembered for "F" cells to make AD4 packs.
Top connections cut from coffee tin.

Replica D6 pack containing NiMH Cell fitted (strap to be added). Made of Coffee tin!

Replica 90V HT pack (60 x AAA Alkaline cells) and new mains lead with Europlug.
Next the Electronics repair and restoration!
To thank the Author because you find the post helpful or well done.
Aerial Mount and Aerials
Repair of plastic aerial socket/mount
To get the basic shape I put parcel tape round the rear panel hole so the resin (Car repair paste) wouldn't stick. Then taped the remaining part on.
I then roughly filled the missing parts.
When hard enough to work I peeled it off and pulled it off the plastic part. The parcel tape came of the rear panel without damage. I then superglued it to the original plastic. After the superglue set I used grinding wheel to roughly shape it. A file would do. Then sanded it smooth. About 120 to 180 grit. Then I finally used knifing putty.

Prior to final sanding
The holes maked from rear and drilled out just twist drill by hand. The countersink using a larger drill bit in the hand.

Ready to be painted.
The metal barrels at the tips coated in knifing putty. They will be sanded and painted too.
The aerials are of a €2.50 "Bargain Shop" (like Poundland in UK) "Rabbit's ear" TV aerial. I cropped the bottom and filed the chrome off to put a ring of solder to stop the aerials pulling out completely. Likewise I filed a ring to expose the brass just below top of bottom section to allow a ring of solder to prevent the aerials falling. These two solder rings mimic the bump and end cap on the original aerials.
Batteries
A replacement of the badly corroded clip to clamp the two D cell holders was cut out of coffee tin doubled over.
To thank the Author because you find the post helpful or well done.