Electrostatic Tweeter Restoration

11
ID: 171424
Electrostatic Tweeter Restoration 
02.Sep.08 06:11
0
11

Paul E. Pinyot † 2013 (USA)
Articles: 187
Count of Thanks: 46
Paul E. Pinyot  † 2013


Oh no! The Electrostatic Tweeter is silent. 
 
Did this ever happen to you? You have just purchased a functional Grundig, Emud, Telefunkin or other radio with Electrostatic Tweeters that do not emit any sound? Or you spent the better part of a month meticulously restoring the chassis and later find the tweeters are silent? This happens to me frequently. I include restoration of the electrostatic tweeters in all units that cross my work bench. It is easy to make the tweeters “Sing” again.
 
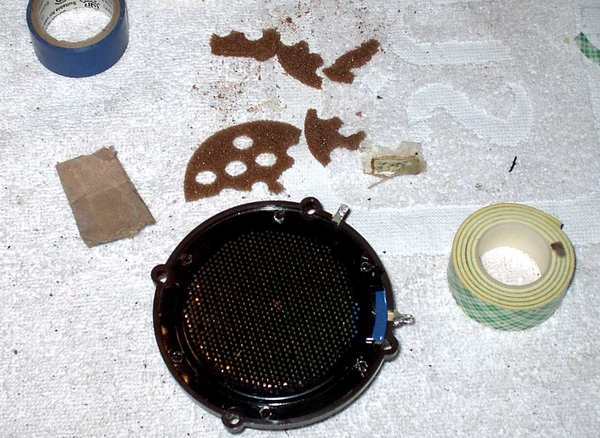
The two primary problems with Electrostatic Tweeters is the foam rubber pressure pad used to hold the Mylar diaphragm against the perforated metal screen. And the second, equally common problem is poor contact and corrosion between the solder lug’s contact point and the conductive surface of the Mylar diaphragm. 
 
In addition to your standard bench supplies have at the ready:
 
Thin Foam rubber to fabricate the pressure pad.
Tools to cut shape and perforate foam.
Emory cloth, tarnish remover, knife scraper, etc.
Drill and bit to remove rivets.
Replacement pop rivets and rivet tool (or small replacement hardware).
Rubber (paper) Cement (or know where to get some. Not all tweeter require glue).
 
When I come across an Electrostatic Tweeter (ET) that I have not seen before I remove it from the cabinet. Some ETs can be fixed with out removal from the cabinet. 
 
The next step is to separate the perforated metal screen from the housing. You may have simple twist tabs, plastic or metal rivets. Drill the rivets out. If they are plastic remove the minimum amount of plastic needed to separate the housing. You will need to re-melt or flair the remaining plastic stud to seal the housing.


Separate all the parts. Be very carful of the Mylar diaphragm. You can tarnish it with your finger prints. If it is stuck to the frame or the metal perforated screen, be gentle. 


Locate the foam rubber. It should be brown and crumble under your finger into sand. You may find a good, reusable pressure pad material like wool. If so you will need not to fabricate a new pressure pad.
 
 
Inspect all contact points. Pay attention to the contact that touches the Mylar film. Remove all corrosion. Use emery cloth, sand paper, scraper, knife, and razor. Use any method to make the contact shine. DO NOT uses emory cloth or sandpaper on the mylar film diaphram!


Also you may need to wipe the corrosion from the Mylar film. Be careful not to remove the conductive coating. Re-positioning of the film, during reassembly, may yield a clean shiny contact point on the Mylar film.
 
Fabricate a new foam pressure pad. Now your art skills will come in handy. I trace the outline on new foam and use scissors, a razor or a hot wire to cut the foam. 
 
 
The foam I use is too thick so I slice it thinner and have multiple new pressure pads.


(This is a homebrew hot wire.  It is made from a piece of wire recovered from a 10 watt wire wound resistor, in series with a 100 watt lamp (dim bulb tester) and a varriac.  The hot wire was constructed on a wooden fruit crate.)


I have come to use a soldering iron to melt the inner pattern of holes and passages. A soldering iron or an old wood burning tool is a lot quicker and cleaner than using cutting tools. One foam pad had small round holes. 
 
 
I have also sandwiched the foam between paper and used a paper hole punch. This technique worked great.
 
Do not try to squeeze a too thick foam pad in place of the old pad. You may reduce the output of the ET. But no harm should come to the ET. 
 
Check the inside of the perforated metal screen. Remove any rust and paint with a spray lacquer or non water base paint. The rough rust may abrade the diaphragm and electrically short the tweeter.
 
There are variations to these ET. You may need double sided sticky foam tape to hold the Mylar film contact tab to a surface so it lines up with and presses against a metal contact. 
 
Reassemble all the components. Hold the assembly together with some tape or rubber bands for testing. Connect the tweeter to your radio chassis and listen. You should hear a noticeable output. If so Congratulation! You are just about finished.


This should not happen but if there is no sound:
A) Check the Mylar film. It may be in insulation side down and not towards the contact.
B) Check the contact to Mylar interface. 
C) Insure there is output from your chassis (tone switches, component failure, etc). You should see AC audio with an oscilloscope. (You may need a load resistor across the circuit, I am guessing about 1 meg ohm or equal to the series resistor in the schematic).
 
If there is acceptable output, re-secure the housing.  Use rivets, melt the plastic studs, glue the case if the plastic studs are missing or use small machine hardware nuts and bolts. 
 
 
Replace the ET back into the cabinet.
 
Good luck and Have Fun!


Please post pictures of your tweeter rebuild.  Include any additional hints, tricks and materials that you have found and used!


Bildbreite korrigiert.

To thank the Author because you find the post helpful or well done.

 2
Integrated pictures 
07.Dec.08 06:56

Ernst Erb (CH)
Officer
Articles: 5741
Count of Thanks: 28
Ernst Erb

Dear Paul
Since long I wanted to write this.
I congratulate you: You have written one of the few most interesting articles about electrostatic tweeter restoration.
You also have made 13 very nice photos to demonstrate the work.

Those pictures are at present attached. I think it would be worthwhile to include the pictures in your article. I know, it is a few steps more - but the result is so much better:

You bring the pictures down to 560 pixel width (in reality they can also be up to 600).
If they are still using more than 40 KB then you might have to reduce "quality". This process is normally not visuable. A few of your pictures are already under that storage size.
Then you load up the pictures according to this instruction made by Georg Richter. See Paragraph 3.4 there. The process is done in two steps: Upload of the pictures to the server, second step, placing your pointer t the place where the picture should be integrated and using the picture icon again for placing the picture.

I then would like to link your article to this article about "Splendid forum texts in English". Can you please tell me if you find any problems and also when you achieved it? I hope you like it then so much that you will have an other try for more repair articles ;-)

To thank the Author because you find the post helpful or well done.

 3
 
12.Dec.08 09:39

Paul E. Pinyot † 2013 (USA)
Articles: 187
Count of Thanks: 33
Paul E. Pinyot  † 2013

Ernst,

I took all the attachments to this article, used Irfranview (http://www.irfanview.net/) to first size then second compress all the images.  I then uploaded these images and placed them in the text of the article. 

Should I post more pictures from my web pages into the text?

Should I remove the attached files which are now the embeded text pictures?

Please let me know if this is what you wanted?

Thanks, Paul.

To thank the Author because you find the post helpful or well done.

 4
Perfect! 
12.Dec.08 14:39

Ernst Erb (CH)
Officer
Articles: 5741
Count of Thanks: 38
Ernst Erb

Dear Paul
You have made a perfect article and the pictures are now very instructive. Thank you for taking the effort.
Yes, you can just click edit again and then scroll down to see the button "Attachment(s)" which you click - just to see the 13 attached pictures with a red "X" in front of them. You now can click those "X", piece by piece and those attachments will be deleted from the hard disk of the server.

One has to know that integrated pictures - as we see now - can be deleted from a thread but not from the hard disk because the program can not know if you want to use them elsewhere in the future - even if they have no connection in the moment.

You can but don't have to add more pictures. It is only advisable if they really help to understand. I think we should use the possibility to integrate pictures for good articles as you did. They help normally very much to understand an article and also invite to read.

You have written an other very interesting article about IF Transformer Repair - and asked me if you should integrate the pictures there too. If you can take the time for that (since they are now too big) this would be most welcome. It has already 945 views and I will now be able to link them to the thread about "Splendid forum texts in English" which will increase the popularity since this link is on top when clicking the tab "Forum".

I hope we will find somebody some time who does care for such matters as I do now with my limited English and limited time. There are surely more members who could write such good articles but hesitate to do so for different reasons. Most often it is being afraid to do something in public or they think it is trivial what they have "to say". But we have to know that guests and members are often newcomers and we may help them to master all this new stuff. Thank you that you care so much for RMorg.

To thank the Author because you find the post helpful or well done.

 5
? Electrostatic tweeter restoration  
31.Mar.10 14:36
2082 de 23288

Stuart Matousek (GB)
Articles: 40
Count of Thanks: 36
Stuart Matousek

I was reading this article and have one question. Is it the case that electrostatic tweeters either work fully or not at all, or may they just work a little but not optimally so may be improved by the method here?

To thank the Author because you find the post helpful or well done.

 6
Diminished output.  
01.Apr.10 16:59
2185 de 23288

Paul E. Pinyot † 2013 (USA)
Articles: 187
Count of Thanks: 24
Paul E. Pinyot  † 2013


Stuart,
 
Yes,  Often replacing the foam wil help.  Addtionally:
 
1) The tweeters in the vintage radios will not produce loud volumes of sound like modern tweeters.  They are subtle and enhance or complete the audio spectrum of the radio's speaker array.  In other words the sound will not be as apparent as a modern speaker enclosure.
 
2)  The decomposing foam does diminish the output of the tweeter.  It will be compromised and replacing the foam rubber and cleaning the contacts will increase the output of the tweeter.  This is the case with a recent Emud tweeter that I restored. 
 
Good luck with your radio.
 
Paul.

To thank the Author because you find the post helpful or well done.