How to post forum pictures
How to post forum pictures

Hello Radiophiles,
The forum posting editor is capable of showing pictures that can be enlarged by clicking them.
You find a first example here on post 3. Just click the small images after klicking this link ...
The basic principle is the same principle behind text that responds to a click: In both cases, a link is associated with the text or the picture.
Linking Examples
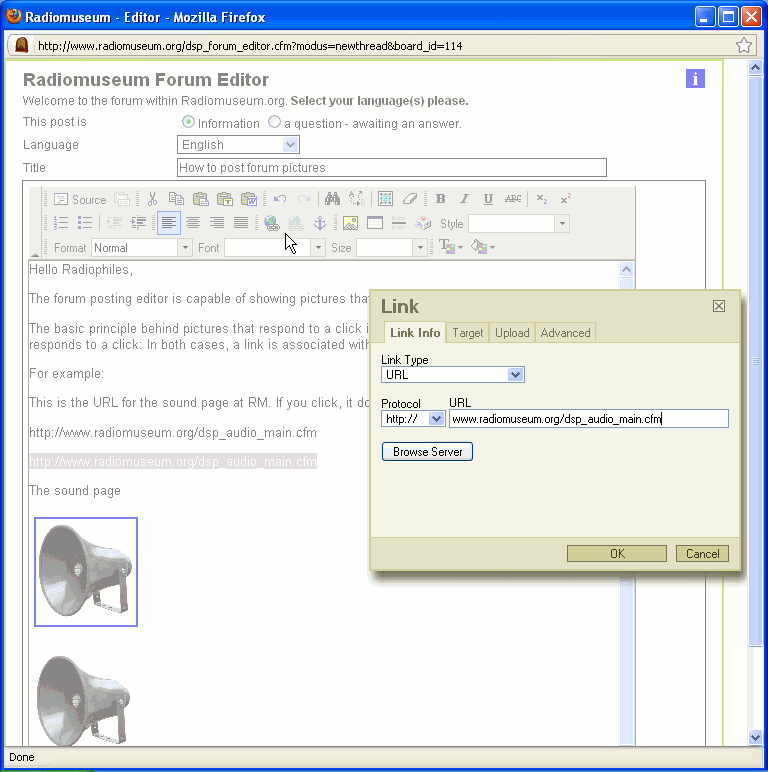
1- radiomuseum.org/dsp_audio_main.cfm
This is the URL for the sound page at RM. If you click it, it does not go anywhere. It is just typed text.
2- Link
This is also the URL for the sound page, but if you click it, it will take you to the sound page. That is because I used the  link button after highlighting the URL text and then entering the URL in the link box. You can unlink existing links with he adjacent unlink button
 . See screenshot of linking.
3-The sound page This is now generic text that is linked exactly the same way as item 2. You highlight the text and use the link button to enter the desired URL. See screenshot of text linking.
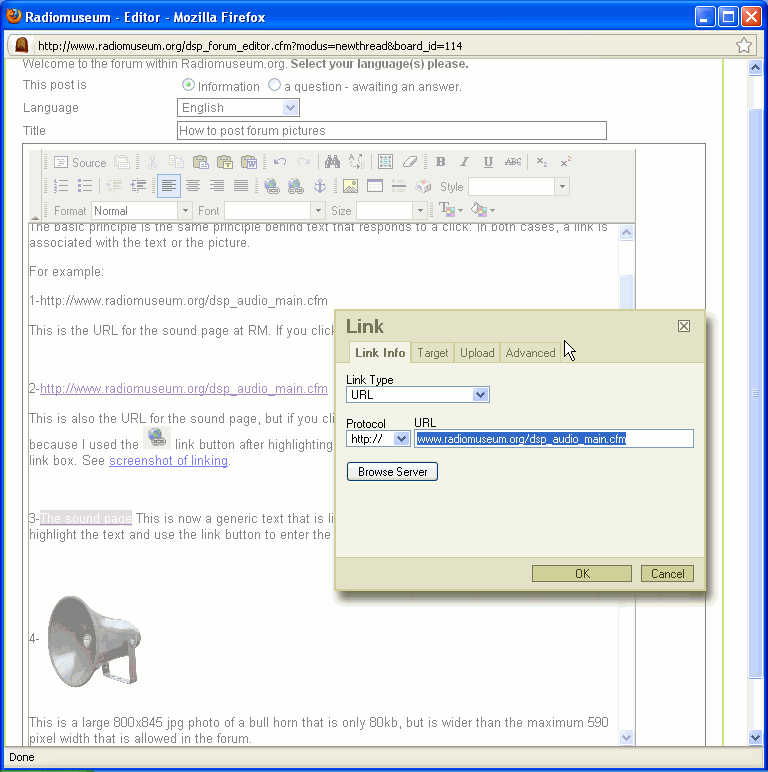
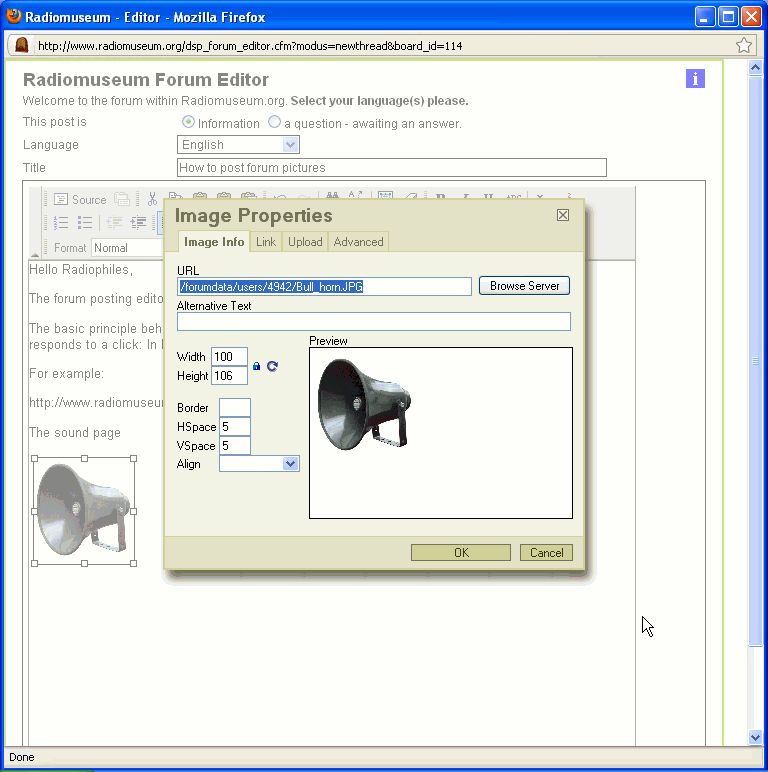
4-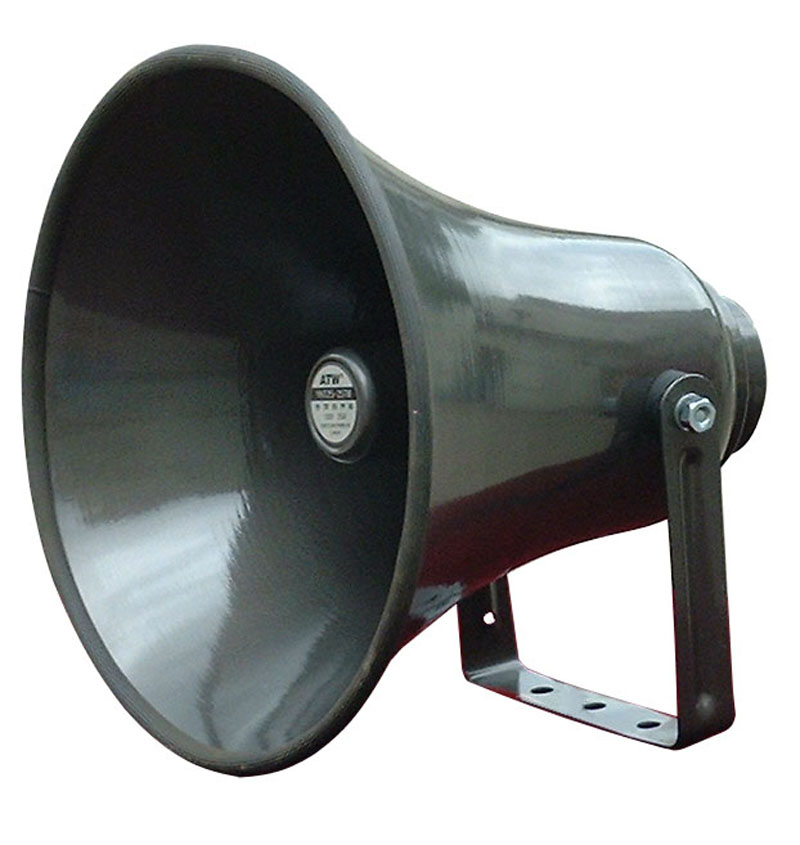
This is a large 800 x 845 jpg photo of a bull horn that is only 80 kb, but is wider than the maximum 600 pixel width that is allowed in the forum.
This picture can be seen full size if you right-clck and save, or right-click and select "view". A simple left click will not magnify the image. But this approach is cumbersome and there is no obvious way to tell that the picture will expand until you try it.
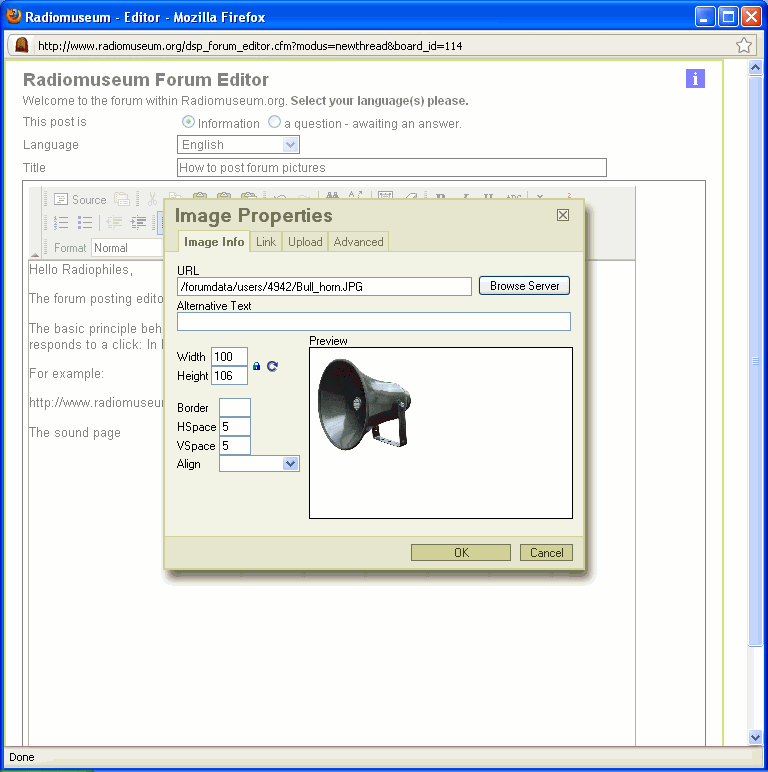
The "image properties" dialog box for posting an image includes "Width" and "Height" settings that shrink the displayed picture to the desired size. See screenshot of image properties.
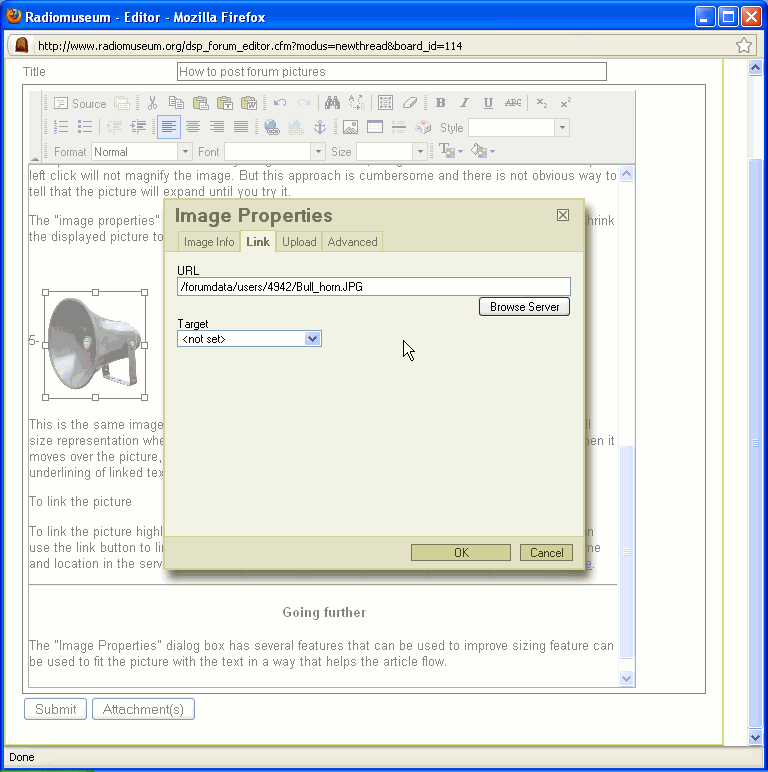
5-
This is the same image as in item 4-, but a link was added to the picture that calls the original full size representation when the picture is clicked. Note that the arrow-cursor changes to a hand shape when it moves over the picture, and there is a blue outline around the picture. The blue outline, like the underlining of linked text, indicates that a link is associated for clicking.
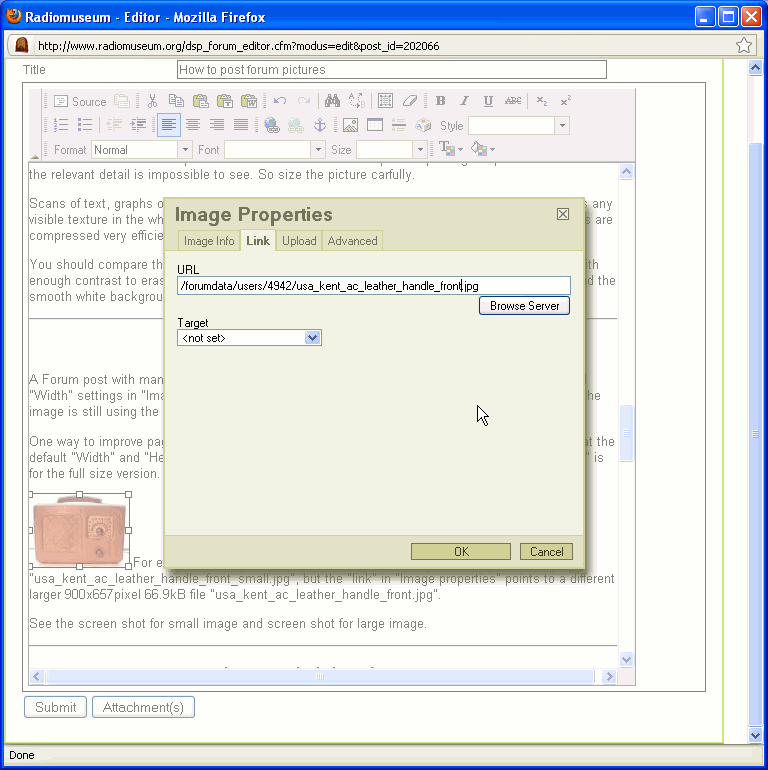
To link the picture, click on the "link" tab of the "Image Properties" box and copy the URL that was shown under the "Image Info" tab. See screenshot of Link tab in Image Properties.
An alternative way to link the picture is to use the link button. Highlight or select the picture after you posted it in the editor page, then you can use the link button to link it to the original image for a full size display. The picture URL or file name and location in the server, are entered in the Link dialog box. See screenshot of linking the picture.
GIF vs JPG vs PNG
Perhaps the most important choice you should make about the picture you are about to post is the compression format.
JPG (Join Photographic experts Group) was original conceived to transmit satelite photos of the Earth with compression, while loosing a minimum of relevant natural detail. The material content was nature and the compression format was optimised for it. If you use JPG for schematics/text-scans/graphs you will get blurry pictures that have a large file size then if they were GIF.
JPG is the ideal format for photographs.
GIF (Graphic Interchange Format) was originaly conceived to compress computer generated graphs without loss. The principle is one where a maximum of 256 colors or levels, are stored in an index table to display each pixel. Adjacent areas of the same color also get represented by indicating the size of the area. Computer generated content was compressed without loss in this format because the computer used less than 256 colors. Unlike in the case of JPG, straight lines can be shown without any blurring. This is the reason why schematic uploads to the models pages must be in GIF or PNG format. If the original computer generated black line schematic were available, only two levels (black and white) would be needed, but in the case of paper scans, allowing a few more levels, perhaps up to 8 levels of gray, makes the lines and text very smooth. If you use GIF for photographs, you will get a paint-by-numbers effect and the file size will be larger than JPG.
GIF is the ideal format for Schematics, Text scans and Graphs.
PNG (Portable Network Graphics) is a format that may have JPG style compression or GIF style compression. This may make it confusing to determine what type of compression is used. Sometimes a schematic is posted in a forum page with JPG compression, and it looks very blurry. A graphics program can be used to ascertain the compression type, but I prefer to use JPG and GIF because there is no confusion.
Image size and file size
Very few photos need more than 180 kB to show all relevant detail, and very few pictures need to be larger than 1500 x 1500. They can be attached instead of inserted.
By the way: Model pictures should be 933 pixels wide (ideal and max.) and max. 1400 pixels high. The only photos that may need a bigger size include a mix of text and photos. 180 KB are allowed. Normally this easy to remember format is enough for model pictures like for this Lafayette 70M 7 Tube Duo-Symphonic (picture 4). Otherwise you prepare it as indexed PNG or GIF with up to 8 levels of gray, and load it to "Schematics" where pixel size does not matter.
Back to the forum: Most photos should be under 100 kB. In a graphics manipulation program such as IrfanView or PhotoShop, you can shrink the XY pixel height and width, crop the photo or compress it to get an efficiently small image that is very clear.
The current recommended photo size is 180k.
Scans of text, graphs or schematics should have the contrast increased to a level that eliminates any visible texture in the white paper areas, then converted to GIF. The solid white, or solid tone areas are compressed very efficiently with GIF.
You should compare the size of a GIF scan where the paper texture is visible, with a GIF scan with enough contrast to erase the paper texture. The difference in file size could be more than 10-1 and the smooth white background file looks much better.
Thumbnails reduce page loading time
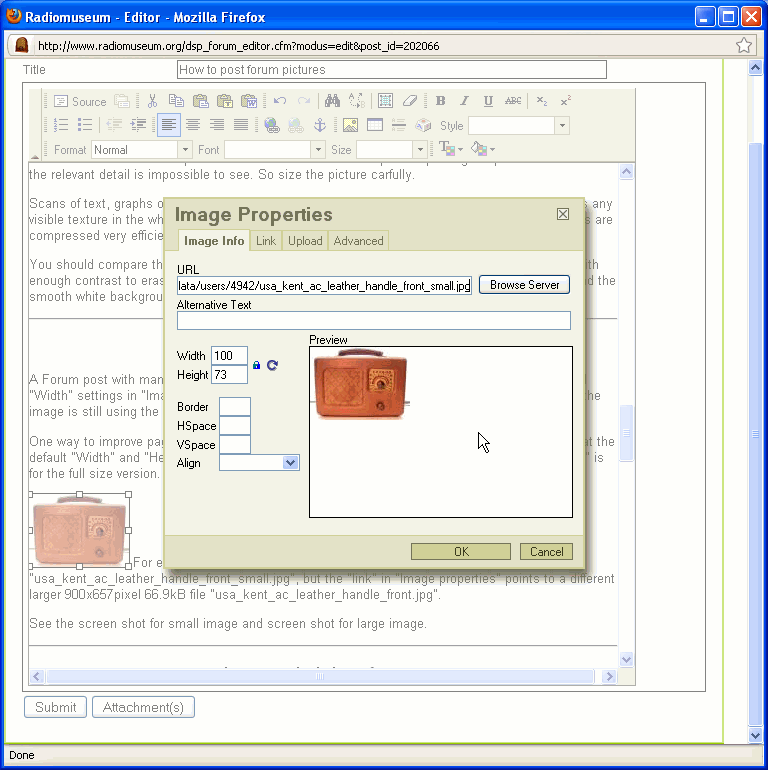
A Forum post with many large pictures that are represented in a small form with the "Height" and "Width" settings in "Image Properties" may be slow to load because the small representation of the image is still using the orignal larger file.
One way to improve page loading speed is to have an actual small picture version (Thumbnail) that is shown at the default "Width" and "Height", but the URL that you enter under the "link" tab in "Image properties" is for the full size version.
For example, this 100 x 73 pixel 2.3kB Thumbnail image is for "usa_kent_ac_leather_handle_front_small.jpg", but the "link" in "Image properties" points to a different larger 900x657pixel 66.9kB file "usa_kent_ac_leather_handle_front.jpg".
See this post about variants of a radio, as an example of a page with 18 Thumbnail images that are only 70-pixel tall, but are linked to full size images. The page loading time is nearly instaneous because the group of 18 small images only occupies a total of 23 kB.
See the screen shot to show small image and screen shot to link large image.
(Edited 2009-12-15 to introduce Thumbnail term. JS)
Image manipulation references
Konrad Birkner has a very good post showing how to use Irfan View to make very clean, detailed scheamtics/text-scans/graphs with the indexed level format used in GIF.
Martin Bösch has a very good post showing how to process and upload photos.
Werner Braun started a thread showing how to use a scanner to capture tube images. with very good results. I used Google-translate to read this German language page.
I posted a related text showing how to use the Anchor Link.
Going further
The "Image Properties" dialog box has several features that can be used to improve the flow of your post.
"Width" and "Height" can be used to fit the picture with the text in a way that helps the article flow.
"Border" adds a black line around the picture with the specified number of pixels. This could be useful to outline a small white schematic.
'Hspace" and "Vspace" add blank space around the picture with the specified number of pixels. This is useful to prevent text from hugging the picture too tightly.
"Align" contains a series of alignment options of the picture.
I found that two of the most useful options are "Right" and "Left". These place the picture against the the right or left edge, so that you can enter text next to the picture that refers directly to it.
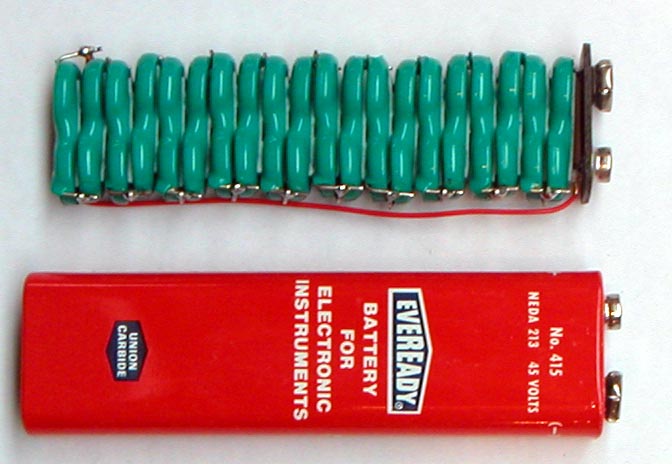
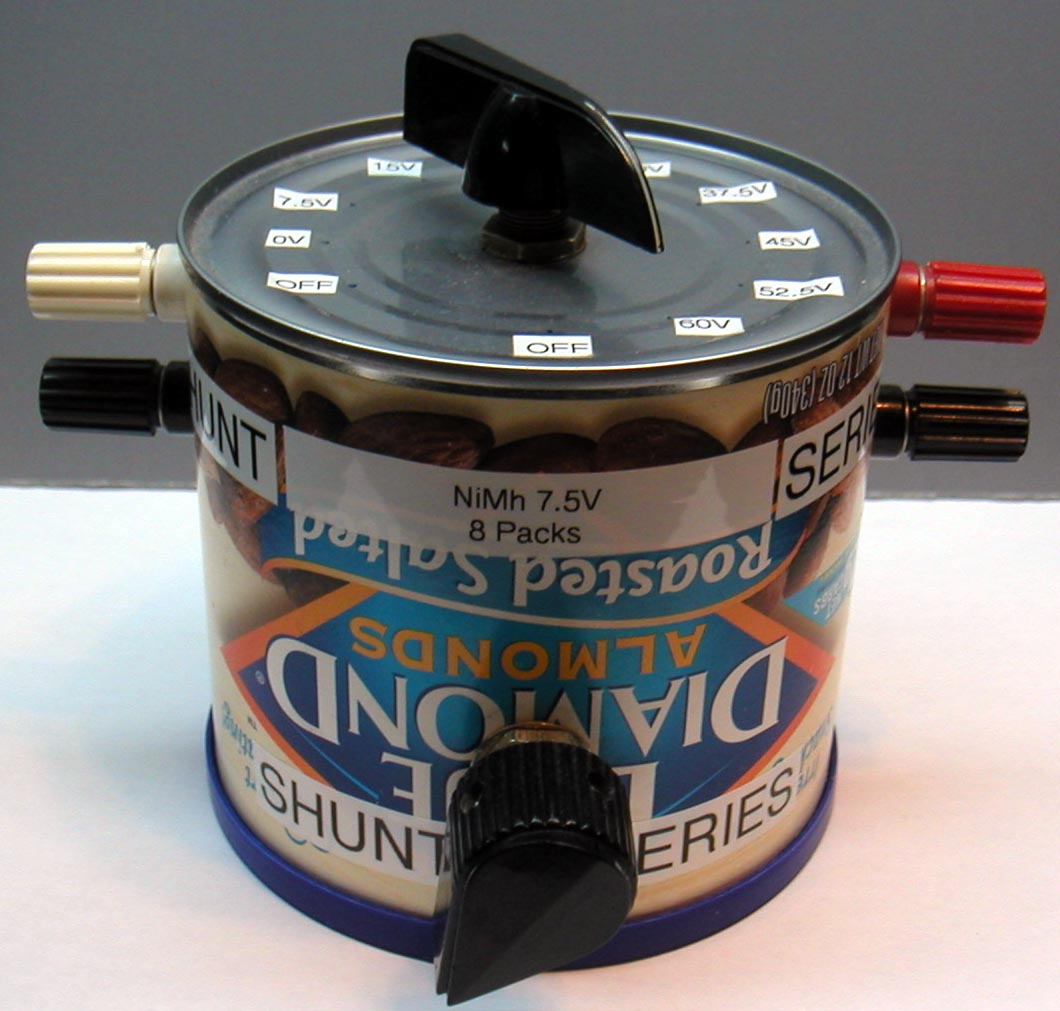
I used the "Right" option under "Align" to show this battery photo. See the screen shot to post a Right image with text on the left.
The "Middle" option is useful to center the picture with respect to text near it. I used this to center item 4- and 5- numbers against their pictures.
An alternative to posting attachments is to place a series of pictures with shrunk representations of the image in a row, then link each shrunk version as shown above.
Another way to align this sequence of photos is to use the alignment button for text in the toolbar. I used the "Center Justify" to get these pictures centered. I also set the "Height" of each picture to 100 pixels and added 5 pixels to "Hspace" and "Vspace" for a nice visual effect.
One last feature you can use is to have one cropped image as the version you see directly in the forum, and a large image with more contente, that appears with clicking.
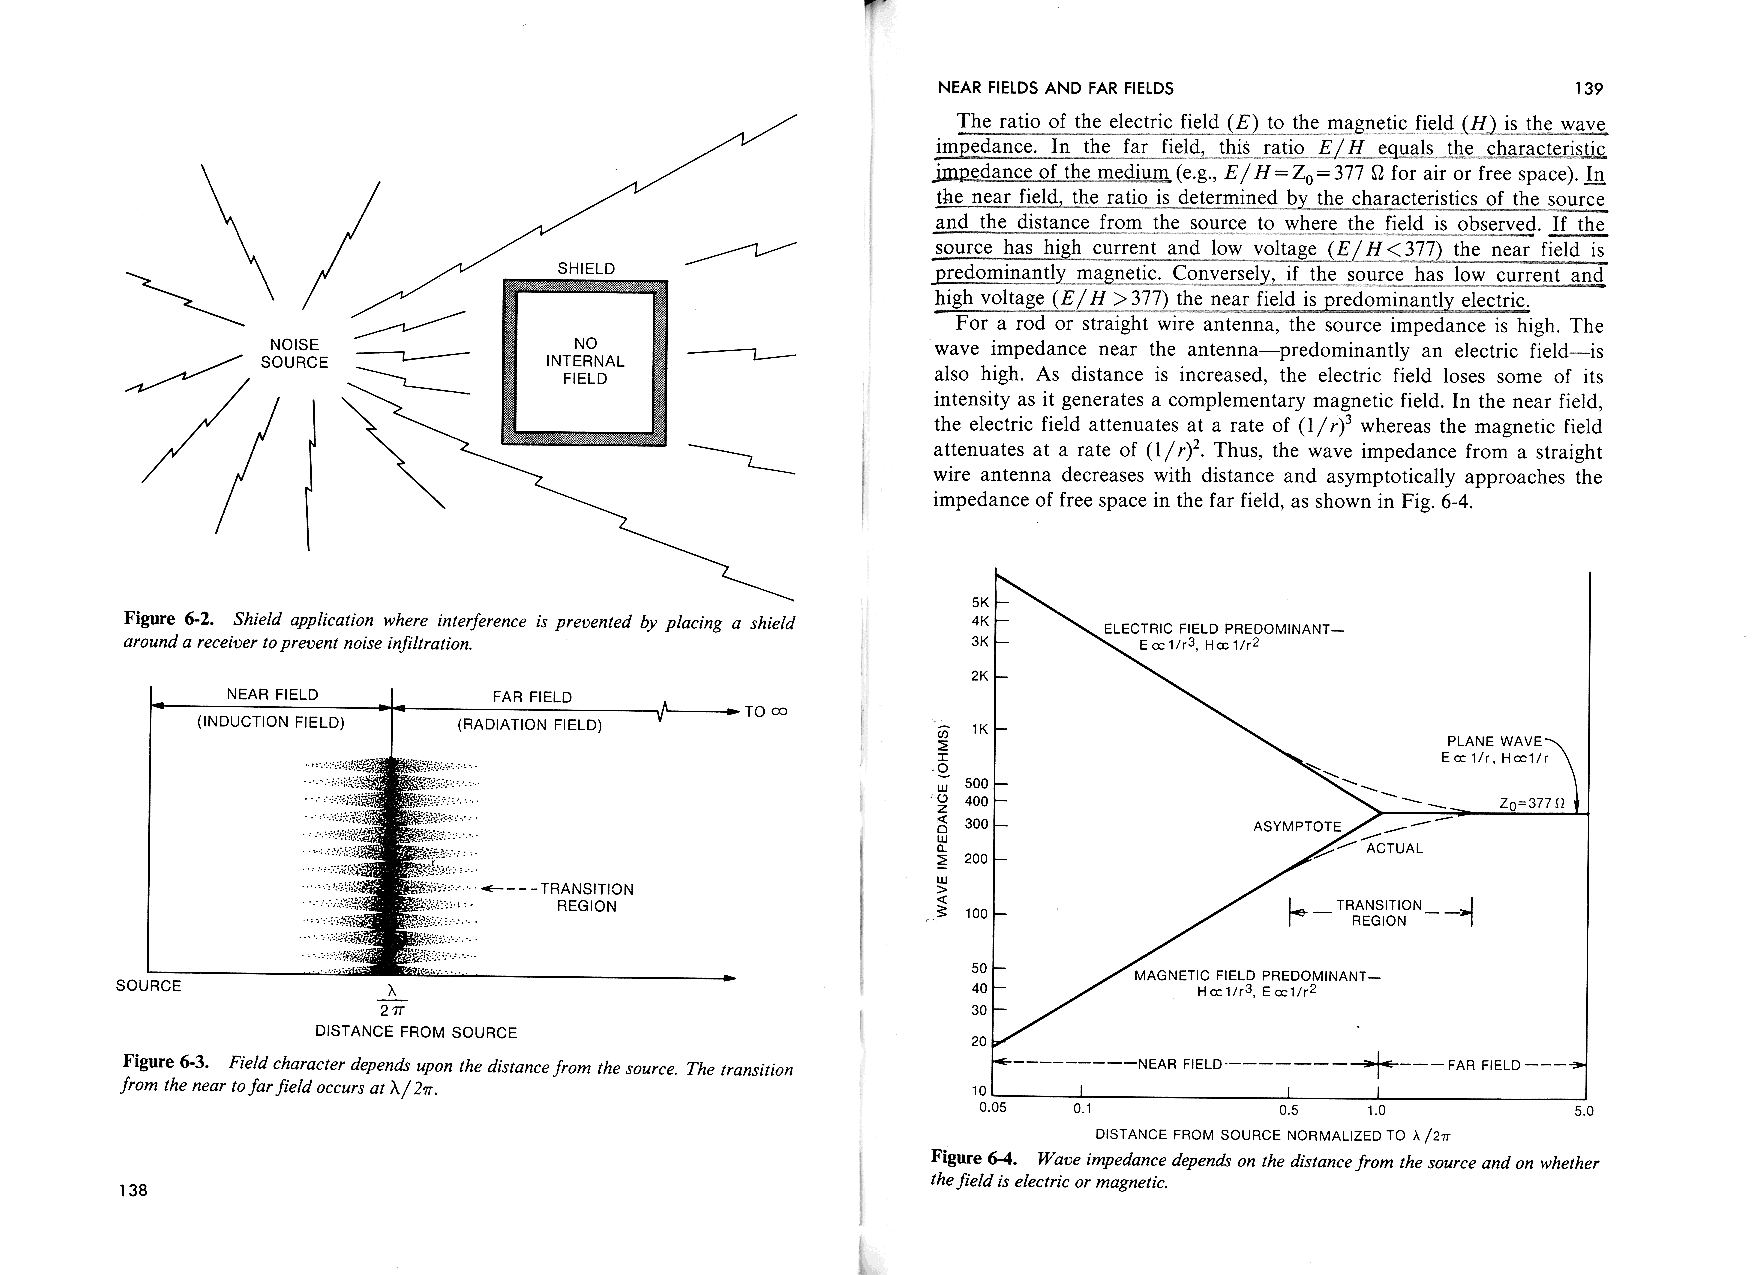
The following example shows one image called "Far&Near_Field_graph.GIF" at full 590 x 546 pixel and 19.4 kB size, but is linked to an image that covers two pages that is called "Far&Near_Field.GIF" 1755 x 1275 89 kB. So in this case, the llinking feature was used to show the most important part of the picture directly in the Forum while making it possible to see the remaining context of the scan with clicking.
Regards,
-Joe
To thank the Author because you find the post helpful or well done.
Click-and-Zoom to attachments
Fellow radiophiles:
The latest version of the RadioMuseum forum text editor performs an automatic image width reduction to 600px for images that exceed this width. This means that if you upload a 1300px wide image, it will be saved in the RM server as a 600px image, but uploading a 450px image will be unchanged.
This function was added to prevent the placement of images that exceed the standard 600px width of the forum format. However, it also eliminated the usual method outlined above that attaches a link on a small image that points to a full size >600px version for detailed viewing, as might be needed for a schematic diagram
Now, the preferred method to upload a wide image, like a 1352px wide schematic is to add it as an "attachment". The attachment function is done with the attachment button that sits below the text entry area of the forum editor:

Follow the instructions after clicking the "attachment(s)" button to upload pdf, doc, xls, jpg, png and gif files up to 200kBytes.
After the attachments are uploaded, you can use the URL of these attachemts in the RadioMuseum server to create links, as outlined in the first post above, to the related images that were shrunk to 600px for display in the forum.
Now there is the minor snag of finding out where these attachment links are. One method is to complete the post and upload it to see the attachment URL addresses at the bottom of the uploaded post. You can right-click and copy these URL's to use as links for the corresponding shrunk images. You will then need to "Edit" your uploaded post again to add links to the corresponding pictures with the newly found attachment URL's.
I used this method of click-and-zoom for the first time in my recent post on Sputnik 9V superheterodyne tube radio.
This screenshot shows how I got the locations of the attachments for subsequent linking in a second editing of the post:

After you have added the links, upload the new edits, and test each of your linked images by clicking them to verify that the correct full size image comes up.
The file that was originally shrunk to 600px width is located in your personal section of the RM server, while the attachments are located at  followed by the attachment file name always in lower case and without illegal characters. This means that the original large file may have the same name as the shrunk version. The attached file may also be in any of the allowed formats listed above.
This new linking procedure is only needed for images that were shrunk to 600px during upload. If you have an image that can be seen superficially with 200px width in the post, but only needs to be magnified to 500px for full detail, then there is no need to attach the 500px full size image because it was not shrunk during upload. You can then simply add a link to the 500px image as shown in the first post.
Best Regards,
-Joe
To thank the Author because you find the post helpful or well done.