zenith: ZENITH "H511 Consoltone" description and repair
zenith: ZENITH "H511 Consoltone" description and repair

Please click on the pics for magnification
1 Introduction
Recently a fellow radio collector asked me to give him a helping hand with the repair of his ZENITH H511 Consoltone (Vintage 1951). After several repair attempts, the reception sensitivity of the set did still not live up to his expectations, and his motivation to invest more time had dropped to zero.
As a matter of fact, one should not expect miraculous reception results from this kind of radio. The ZENITH H511 was just a standard "AA5" mediium wave receiver, using the then frequently seen tube line-up 12BE6, 12BA6, 12AT6, 50C5 (50L6GT) and 35W4.
Nevertheless I offered my help. On one hand, I was eager to learn a bit more about the general layout of ZENITH radios, on the other I found the cabinet much too pretty to leave the set unrestored, put it back into the shelf, let the dust settle on it and let it serve as a mere 'conversation piece'.
Although I only had the H511 chassis in my workshop, I wanted to give you an impression of the elegant outer appearence of the set. So here is a picture from the corresponding RM model page.

Apart from the model H511 discussed hereafter, there was a whole series of sets using the same Chassis 5H01 but came in different cabinet colours:
H511F Consoltone, H-511-G Consoltone, H-511-R Consoltone, H-511-W-Consoltone und H-511-Y Consoltone.
2 The Schematic Diagram

2.1 Input circuit
The RF - signal is picked up by the frame - antenna and coupled directly to g3 of the Pentagrid Converter 12BE6. L1 in combination with section C2 of the twin variable capacitor form the tuned input circuit. Trim capacitor C1 serves for fine - tuning the input circuit. Inductive fine tuning was not included.
The capacity variation achieved with C2 was measured using R&S KARU :
ΔC2 ≈ 27 ⇒ 460µµF, the max. value of trim capacitor was C1 ≈ 30 µµF. The max. sum - capacity resulted therefore in (C1 + C2) max = 490 µµF.
Lower frequency boundary of MW band
Assuming a half activated trim capacitor C1 = 15 pF, and neglecting wiring and tube input capacity (they are negligible compared to (C1 + C2)max), one gets (C1 + C2) = 475 µµF.
In the left lower corner of the schematic one can see the specified MW reception band Δf MW = 535 ⇒ 1620 kcs.
With a circuit capacity of 475 µµF the low frequency band boundary of 535 kcs is reached by using an inductance of L1 = 186 µH.
Upper frequence boundary of MW band
Using the measured minimum capacity of C2 (27 µµF), and the half activated trim capacitor C1 =15 µµF, on ends up with a minimum circuit capacity of (C1+C2) = 42 pF. Together with the inductance of the frame anrenna L1 = 186 µH the upper limit of the reception frequency is 1800 kcs.
Taking into account the wiring and tube input capacity of a few µµF, the input circuit can be expected to cover the full specified MW frequency range of 535 - 1620 kcs.
2.2 Oscillator Circuit
The oscillator has to cover a frequency range, displaced above the reception range by the intermedidiate frequency:
Δf Reception = 535 ⇒ 1620 kcs, IF = 455 kcs ⇒ Δf osc = 990 ⇒ 2075 kcs.
The oscillator circuit is composed of the coil L2 = 127 µH (measured using R&S LARU), section C3 of the tuning capacitor, and the trim capacitor C1osc. The hot end of the oscillator circuit is coupled to g1 of the 12BE6 via 110 µµF, while inductive feedback is made into the cathode circuit of the 12BE6. .
R&S KARU measurement of the capacity variation of the oscillator section of the tuning capacitor gave ΔC3 = 45 ⇒ 210 µµF, while the max. capacity of the associated trim capacitor was less than that of the input circuit: C1osc ≈ 20 µµF.
Again assuming a half activated trim capacitor C1osc, the measured L and C - values result in the following oscillator frequency range:
L2 = 127 µH, Δ(C3) +C1osc = 55 ⇒ 220 pF ⇒ Δf osc = 952 ⇒ 1904 kcs
This means that the highest frequency that the radio can receive is (1904 - 455) kcs = 1449 kcs, way below the specified 1620 kcs!
If we re- calculate the oscillator frequency range assuming a completely de-activated oscillator trim capacitor C1osc, we get:
L2 = 127 µH, Δ(C3) = 45 ⇒ 210 pF ⇒ Δf Osz = 974 ⇒ 2105 kcs
This result sounds a bit better, since the values are now closer to the required Δf Osz = 990 ⇒ 2075 kcs, but one has to keep in mind that up to this point, the frequency range calculation had been done neglecting the wiring and 12BE6 grid capacity.
In reality, the uppermost oscillator frequency reached in this radio with completely de-activated trim capacitor was 1900 kcs, corresponding to a max. reception frequency of 1445 KHz.
Using L2 = 127 µH this means that the min. circuit capacity was 55 µµF, i.e. 10 µµF more than the min. value of the tuning capacitor without C1osc. This meant that the wiring and tube input produced the same capacity as a half activated trim capacitor.
Conclusion:
What we see is: Δf reception ≈ 500 ⇒ 1445 kcs versus
what we should see: Δf reception = 535 ⇒ 1620 kcs
The solution to this mysterious discrepancy will be presented in section 4.3.
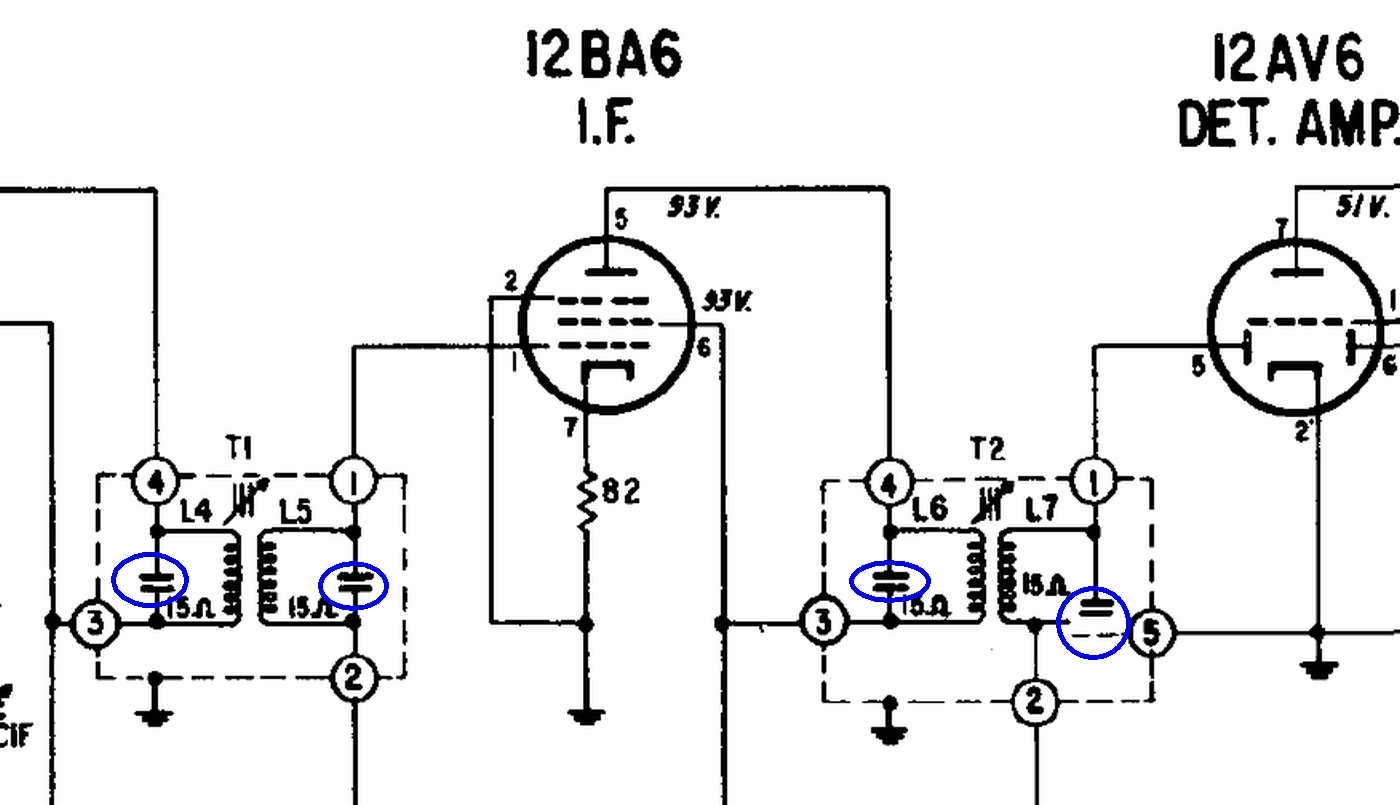
2.3 IF - Amplifier and Demodulator
The IF - signal leaving the 12BE6 mixer is amplified in a varable mu penthode 12BA6 and demodulated in the diode section of a 12AT6.
The IF - filters were tuned to the then standard IF frequency of 455 kcs. While the 1st IF - filter ('95-1101') represents a standard bandpass filter with parallel capacitors of ≈ 120 µµF (not stated in schematic), the 2nd filter ('95 1102') shows a pecularity that is also found in many other ZENITH radios:
Both, AGC and AF voltage are derived from the neutral end of this filter (green line).
2 capacitors are connected to this neutral end: one leading to the cathode of the 12AT6 (i.e. bridging the volume control pot), another is put in series with the IF - circuit capacitor.
A comparison with the schematic of the ZENITH G503 shows, that the latter capacitor was erroneously introduced into the schematic of the H511.
All IF - filter capacitors were encircled in blue
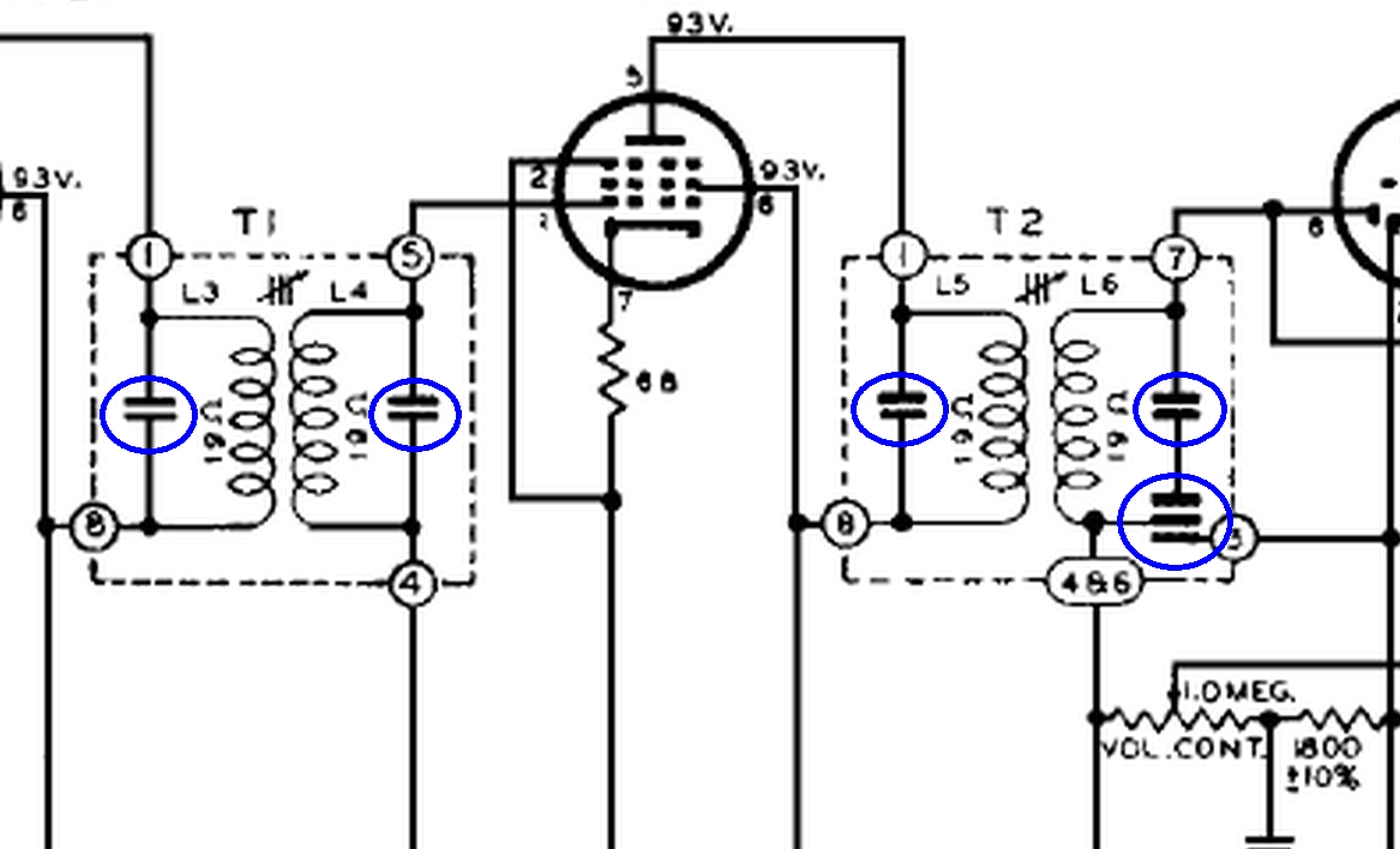
ZENITH H511 Ch=5H01 (1951) ZENITH G503 Ch=5G41 (1950)


Apart from models H511 and G503 one can find IF - filter neutral end capacitors drawn in a somewhat unusal fashion in other ZENITH models. Here are two more examples:
ZENITH F615L Ch=6F05 (1962?) ZENITH 6G004Y Ch=6C41 (1947)

Model 6G004Y used IF - filters with capacitive tuning, but even here, one can see the unusal capacitor combination with the neutral end in common.
In section 4.4 below, it will be shown that with the goal of reducing production costs, ZENITH had adopted the habit of integrating these capacitors into the filter base plates.
2.4 AF - Amplifier
The triode system of the 12AT7 served as AF - preamplifier, the beam power pethode 50C5 - or alternatively its predecessor 50L6GT - served as the speaker amplifier.
2.5 Power Supply
A one-way tapped filament rectifier tube 35W4 was used for the plate voltage supply. The 6-8V / 150 mA dial lamp was placed across one half of the filament, thus avoiding current overload during the tube warm-up time when filaments are still cold and current flow in the heater circuit is accordingly high.
Since both, the filament and the sum of all plate currents pass trough the tube heaters, the dial lamp shows only a dark glow as long as the tubes are cold. Once the tubes reach full emission, the dial lamp shows normal glow. A clever invention!
3 The mechanical setup

Some pictures of the chassis I received for repair:


Apart from re-stuffling the electrolytic capacitor (60 µF / 150 V und 20 µF/150V), nothing was changed on the chassis top,

Most of the capacitors and resistors had already been replaced by modern components, before I received the chassis.
4 Repair actvity
The owner complained about the poor sensitivity of the radio. The defects responsible for this problem will be described below.
4.1 Test setup
The test setup comprised the following equipment:
- Signal generator SMLR with 30% / 1 kc AM modulation.
- Output of SMLR fed into homebrew frequency counter and calibrated attenuator TG-950, .
- The attenuated RF - signal leaving the attenuator was coupled into a small loop antenna (originating from a PANASONIC SA-PM17 Receiver). RF - voltage at the feedpoint of the frame antenna ≈ 2 mVpp
- The receiver frame antenna picks up the the modulated AM - signal
- The 1 kc AF signal amplitude at available at the speaker terminals was recorded using a PM3310.oscilloscope
- 50 cs hum suppresion was achieved by using a 2nd order LC - high pass filter: C = 165 nF, L = 157 mH ⇒ fg ≈1 kc (resonance) between speaker and oscilloscope.

4.2 Loop antenna
The owner communicated that he had bought the radio in the US without speaker and cardboard rear panel. As one can see on the RM model page of the ZENITH H511, the loop antenna was attached to the rear panel.
To keep the radio as close as possible to the original state, he had decided to produce a replica of the rear panel , but instead of glueing the antenna on the cardboard (difficult job!) he modified the design in such a way that the RF Litz wire coulb be directly wound on the rear panel body
Original Replica


Measuring the inductance of the replica coil, I found 290 µH instead of the required 186 µH derived in section 2.1. After removing a couple of turns, I ended up with 185 µH.
With the help of trim capacitor C1, the input circuit could now be properly tuned.
4.3 Oscillator
The insufficient oscillator frequency range proved to be somewhat problematic.
In most radios provisions are made for inductive and capacitive alignment of the oscillator circuit - in the present case only capacitve corrections can be made.through trim capacitor C1osc.
Since, even with completely de-activated trimmer, the frequency range covered by turning the tuning capacitor from fully in to fully out was too narrow - - the problem had to be caused by an undiscovered "parasitic" capacitor.
This can have several reasons:
- Excessive input capacity of the oscillator grid of the 12BE6 pentagrid converter (the tube found in the set was branded DELCO).
- Humidity absorbtion into the oscillator coil (water has a dielectric constant ε = 81, as oppposed to air ε ≈ 1).
- Aging of the dielectric constant of oscillator coil grouting agent (wax in the present case).
af 1.) Swapping the 12BE6 with a tube made by LORENZ didn't have any influence.
Zu 2.) In order to exclude scenario no 2, the oscillotor coil was demounted and heated until the wax liquified and dropped out. The following pictures show the coil before and after heat treatment.


The change of the coil intrinsic capacity was checked via the change of its resonance frequency.
These measurements were made using the 'EXCITER' described here.
Prior to the heat treatment the intrinsic resonance frequency was 3,488 mcs. With the already mentioned inductivity of the oscillator coil of 127 µH one gets a parallel capacity of 16,4 µµF.
After the heat treatment only a marginal freuence change of a few kcs was observed. This means that a potential influence of infiltrated humidity could also be excluded.
In order to exclude reason number 3 cited above, i.e. the influence of aged wax, one could removed the wax by immersion into a wax dissolving solvent. But fearing that the coil might disintegrate, I preferred to refrain from this adverure.
Finally, my old friend RM member Hans M. Knoll proposed to closely inspect the wiring of the oscillator circuit.
So I demounted the compete tuning capacitor and found a surprise: While on its top side both, input and oscillator stator had a parallel trimmer, there was another trimmer (red circle) on the bottom of the oscillator stator! The adjustment screw if this trimmer was so firmly tightened that it took brute force to open it.
Tuning capacitor top Tuning capacitor bottom


⇐ Hidden trimmer position
With the tuning unit in place one could in principle see the adjustmant screw of the bottom trim capacitor, but its function did not occurr to me.
The oscillator circuit capacity values of the demounted tuning unit were then verified with the trim capcitors tightened and loosened, respectively, and the following encouraging results were obtained:
Oscillator tuning section capacity range
- upper trimmer fully loosended, lower trimmer fully tightened: Cmin = 38 µµF, Cmax = 202 µµF
- upper and lower trimmer fully loosended: Cmin = 11 µµF, Cmax = 175 µµF
This means that the neglected bottom trim capacitor introduced a parallel capacity of
C1osc,bottom = 27 µµF (!) into the oscillator circuit. This led to the observed effect of the frequency tuning range being too narrow.
After cleaning, replacing the rubber grommets, and adjusting the bottom trim capacitor to 10 µµF, the tuning unit was put back in place.
After releasing the bottom trim capacitor from initially 27 µµF to 10 µµF, the oscillator frquency range could now be trimmed to cover the entire specified MW range.
Surprisingly, the existence of the oscillator bottom trimmer was neither mentioned in the ZENITH alignment instructions nor in the schematic illustration of the chassis components.


Apparently, the bottom oscillator trimmer belonged to the components that were set during production and no further adlustment was anticipated. The fact that in the present case this trimmer was found to be firmly 'banged' could be a consequence of an earlier unsuccessful repair attempt.
4.4 The IF - Filters
The most difficult part of this repair job was encountered during the attempt to re-align the IF - filters. In the course of previous alignment attempts the ferrite cores ('tuning slugs') had been damaged and could not be moved any more.
Here are a few pictures of the first IF - Filter:


The coil - bodies of both IF - filters consisted of 0,4 mm ( 0.016'') thick impregnated paper cylinders of 7 mm (0.28'') outer diameter with 3 lateral notches, one of which bore regularly spaced corrugations.
 ZENITH loved IF - filters, the slugs of which could both be operated from the top, such that the filter bottom was free for a fixation bolt.
For this purpose, the tuning slugs had central hexagonal holes. A special alignment wrench had been devised, consisting of a slim cylindrical stem and a hex - key shaped lower end (see sketch on the left).
When fully inserted, the hex - key end would penetrate into the lower tuning slug, and this could be rotated without affecting the position of the upper. By lifting the wrench a little, the hex key end would leave the lower slug and penetrate the upper, which could then be adjusted separately.
Since the coil bodies had no thread, ZENITH relied on the tuning slugs to cut their own thread into the paper coil body as they were inserted. For a one-time factory adjustment procedure this was a clever and cost-saving approach, but it was definitely not apt for repetitive re-alignment. The rough surface of the ferrite tuning slugs would inevitably damage the inner surface of the paper body and grip was lost for good.
Unfortunately, none of the 4 slugs could be rotated in the present case, since all hex key holes had been damaged as a consequence of previous repair attempts. So I decided to simply destroy the tuning slugs and install suitable replacements. .
For this purpose I inserted a steel hex key into the pre - damaged tuning slugs. A slight twist broke the brittle ferrite slugs and the bits could be easily removed from the coil body. This approach works because of the gauge difference between continental EU and US hex keys. There is one EU hex key that has a slightly smaller gauge than the US original. Twisting it puts just the right shear force on the ferrite.
Prior to this action one should make sure that the coil body can't move in its holder. The coil wires are very delicate and if the coil body moves / rotates, they can easily be ripped off! So please use some epoxy to guarantee a stable seat of the coil body with respect to the filter base! Obviuosly, the paper coil body will slightly expand when destroying the tuning slugs. But in the present case, this did not cause any problems.
Now we are at the point, where the coil bodies can be refilled. In the EU you can get coil bodies with 5 or 6 mm outer dia. Since the ZENITH coil bodies have an inner dia of 6.2 mm (0.25''), one is tempted to insert the 6 mm type. Please, don't try that!. As was mentioned before, the original ZENITH paper coil bodies have lateral notches which reduce the inner dia just below 6mm. If you force the 6 mm type inside, the paper will inevitably break and you're lost.
To be on the safe side, I used the 5mm outer dia type which comes in differents lengths and tuning slugs with different magnetic permeabilitis for use in different frequency band applications.

Tuning slugs with yelow, magenta and white color dot are for Medium and Long Wave application, those marked red and green are for Short Wave.

This picture shows the original first IF - Filter with the 5 mm coil body insert next to it. When using tuning slugs with yellow color dot, little insertion into the IF coils was necessary to reach resonance at 455 kcs. Due to perspective distortion, this is not clear in the picture.
Obviously, the tuning slugs were inserted from the outer side of the coils to avoid core over-coupling.
It should be mentioned that the filter circuits are loosely coupled. This means, that tuning one circuit has very little influence on the other circuit. This means that for the alignment procedure one can intitially remove the upper slug and tune the lower. After the lower is tuned to 455 kHz, the upper slug is inserted and the upper circuit is tuned without interfering with the resonance point of the lower circuit.
In the present case this was verified by monitoring the resonance frequency of the lower circuit while tuning the upper circuit. Since no significant frequency shift was observed one can be sure that the mutual influence of the correct tuning points is small.
 Looking at the interior of ZENITH IF - filters, the question arises where they hid the capacitors (marked with blue circles in the schematic)
The answer: They were almost invisibly accommodated between the two base plates
The soldering terminals were shaped like little 'fans', and a Mica washer was placed between them, the sandwich setup forming Mica plate capacitors . .
Coil soldering terminals: red and green, Mica washer: blue

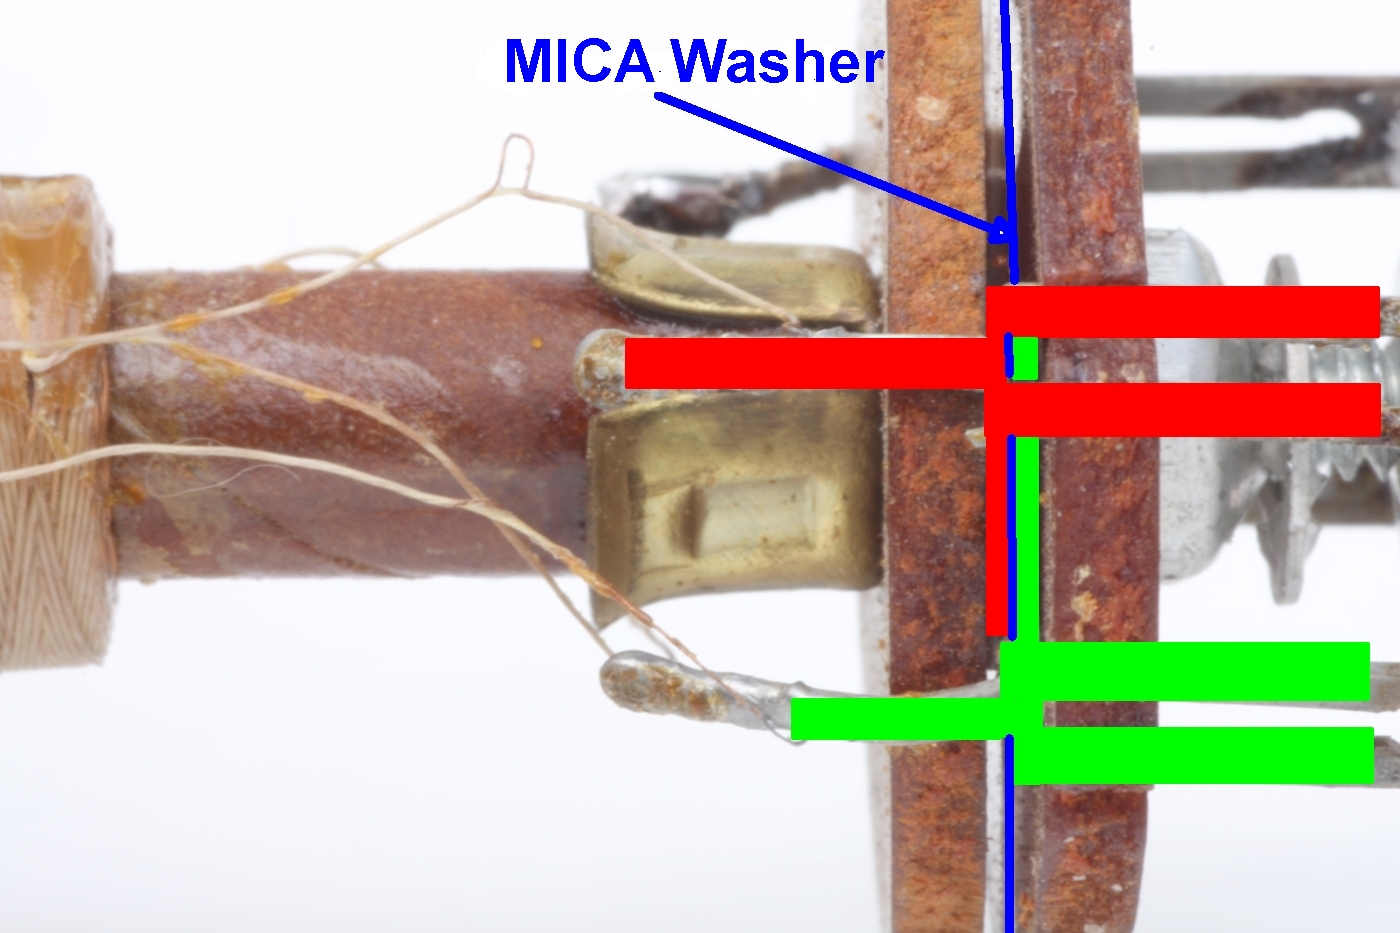
Using this crafty sandwich construction, and thus avoiding extermal capacitors, ZENITH managed to reduce production costs.
It may go without saying that the same trick was used for the capacitor combination at the neutral end of the second IF - filter.
6 Final remarks

One can conclude that after the restauration, the radio is in working order, but that the sensitivty is still not overwhelming.
In view of the fact that ZENITH marketed the model H511 (and others like the recently discussed ZENITH Modell G503 Ch=5G41 ) as "Long Distance Radio" , I have a feeling as if this catchword was not really justified.
But maybe one should not have too high expectations when it comes to the sensitivity of standard AA5 receivers.
In any case, they were very flashy little radios!
My thanks go to Hans M. Knoll for his never tiring support.
Harald Giese
To thank the Author because you find the post helpful or well done.